
 Hire Us
Managing many network devices can be a pain. Especially if you need to simply plug a device in and repeat the steps to configure your the device. Thankfully, Ubiquiti's controllers can be automatically discovered and joined to UniFi using DHCP Option 43.
In this article, we'll go through configuring a Mikrotik Router that is running Routerboard 3.x (my version that I am using at this time of the article).
Step 1: Configure your UniFi controller
A few things to remember before getting started:
- Make sure your UniFi controller is always running (using a cloud key or a computer that is dedicated to serving the network with the UniFi Controller services)
- Make sure your UniFi controller has a static IP address (this is very important). It can be a local static IP address, or a WAN static IP address. Whatever IP address it is, your devices must be able to access this IP and it cannot change
Step 2: Configure your DHCP Server in Routerboard
After you have your controller up and running, you will want to sign into your Mikrotik router. For simplicity sake, I am using Winbox (available on Windows [see download at bottom of this page] or Mac OS X).
- Once logged in, on the left sidebar go to "IP > DHCP Server".
- At the top, you will find a tab called "Options". Click the "+" sign to create a new option.
This is where things get fun...
Step 3: Convert your IP address to hexadecimal
Don't screw this step up because it is kind of confusing. Take your static IP address (for my example, I am going to use 192.168.1.200) and convert it to hexadecimal format using the IP to Hex Converter tool.
You'll see your result below, but we need to modify it yet:
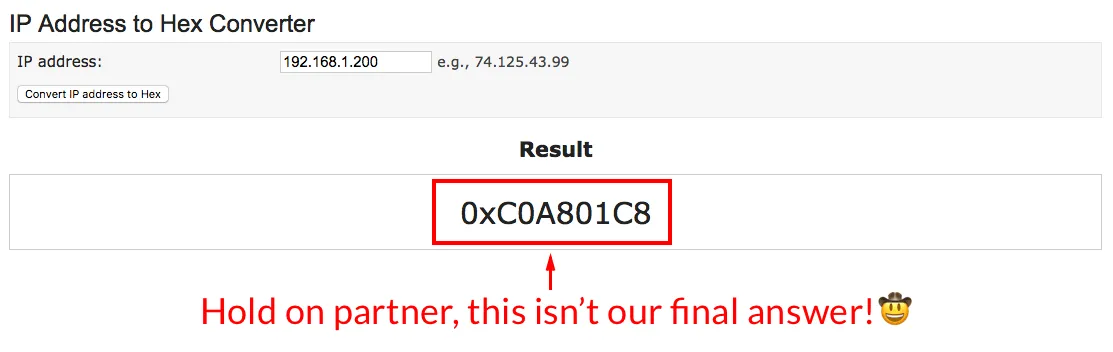
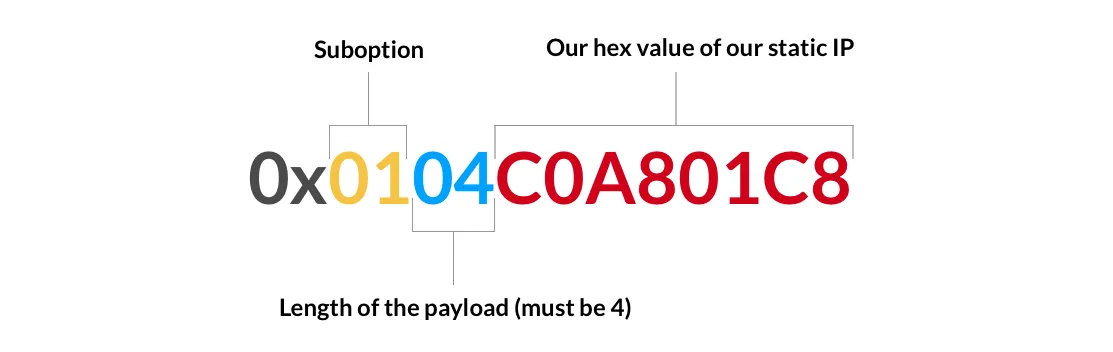
We need to take our result (in my case 0xC0A801C8) and add 0104 after the x in the hexadecimal result that was created for us on the IP to Hex Converter tool.
This will give me a final result of: 0x0104C0A801C8
Why 0104? This is how the documentation explains it:
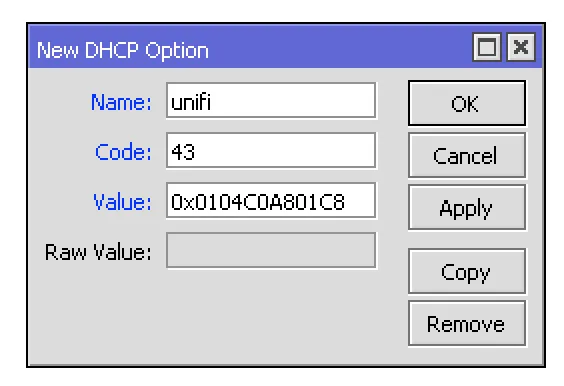
Going back to the "New DHCP Option screen, configure your options with the following options:
Name: unifi
Code: 43
Value: {{ your "final result" after modifying your hexadecimal IP }}
It should look like this once you are complete:
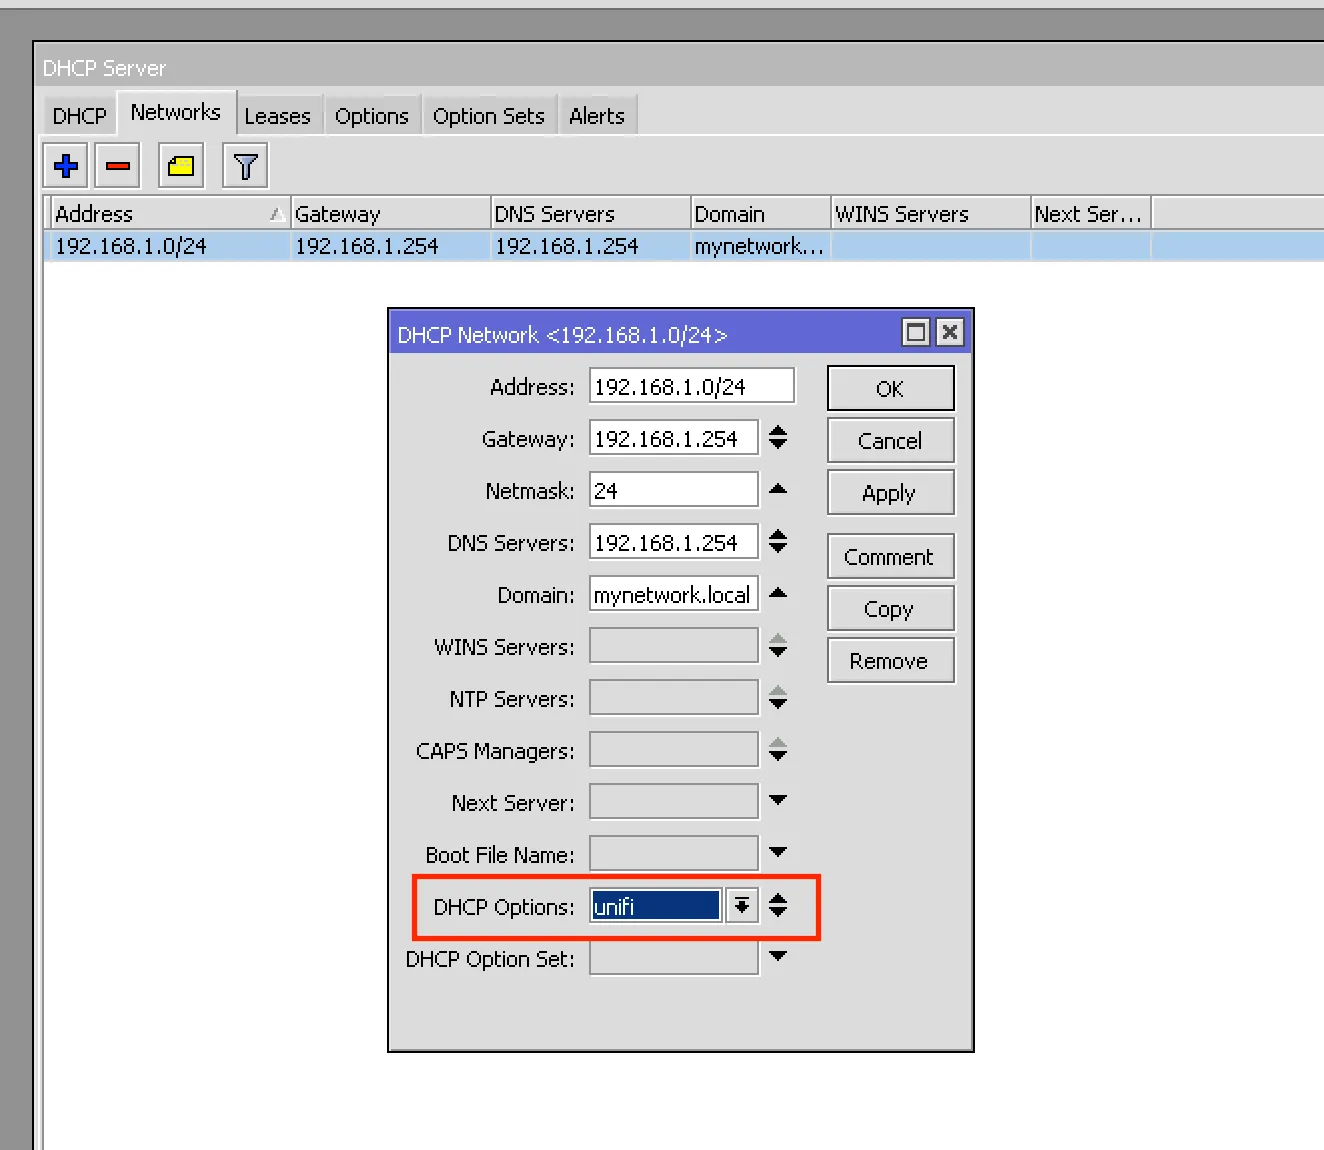
Step 4: Configure your DHCP network to use the "unifi" option
Under "IP > DHCP Server" then under the "Networks" tab, you will see a list of all your available DHCP networks. Double click on your network and assign it the unifi option that we just created.
Step 5: Plug in your factory default device
Now all you need to do is plug in your factory default device and connect it to your network. If you have a device that belonged to a different network or controller, reset the device first. When your device is booted and connected to your network, open up your controller. You should see a new device that is awaiting adoption.

Click "Adopt" and all your network settings will be applied to that device. This method has saved me countless hours of going on site and makes device upgrades painless. It's so easy, even my grandmother can do this (literally). All you need to do from this point forward is have the device on and plugged into the network and you can manage it anywhere in the world.
If you found this article helpful or if you have any questions, drop a comment below!
Like what you're reading?
We write code the same way -- production-grade, well-documented, and built to last. Two senior engineers available for a fraction of what a full-time hire costs.

Join our community
We're a community of 3,000+ members help each other level up our development skills.
 Join our Discord
 Platinum Sponsors

Active Discord Members
We help each other through the challenges and share our knowledge when we learn something cool.
Stars on GitHub
Our community is active and growing.
Newsletter Subscribers
We send periodic updates what we're learning and what new tools are available. No spam. No BS.
Sign up for our newsletter
Be the first to know about our latest releases and product updates.
We're a community empowering product builders with self-hosted tools and open source solutions.