
 Hire Us
Packaging a NuxtJS app for iOS and Android with CapacitorJS
Dan Pastori
August 16th, 2020
This is really where the magic happens! The way to get a NuxtJS application packaged and deployed to a mobile app store is with CapacitorJS. CapacitorJS allows you to package web code, access native phone hardware, and deploy that code to both iOS and Android app stores.
You could do similar functionality with Adobe Phonegap. However, Adobe has shut down phone gap and passed the torch to CapacitorJS. CapacitorJS has modern build tools, beautiful documentation, a wonderful community and powerful plugins. I'm really excited for this project and the future of app development!
Let's install CapacitorJS alongside our NuxtJS project.
Step 1: Install CapacitorJS
CapacitorJS installs alongside your NuxtJS project as a standard NPM package would. This is wonderful because it allows you to keep all of the project pieces together. You don't have to have your NuxtJS app and then transform the structure to something different when you are ready to deploy. If you have used Cordova, you know this is how that would work. You can just keep all code in the same repo.
The first step is to install the CapacitorJS package within your NuxtJS install:
npm install @capacitor/core @capacitor/cli
These are the two packages you need to install CapacitorJS. Once that's complete, we need to initialize CapacitorJS.
Step 2: Initialize CapacitorJS
Once you have CapacitorJS installed, you need to initialize it. This will create a capacitor.config.js file where you can set up everything you need for your mobile application.
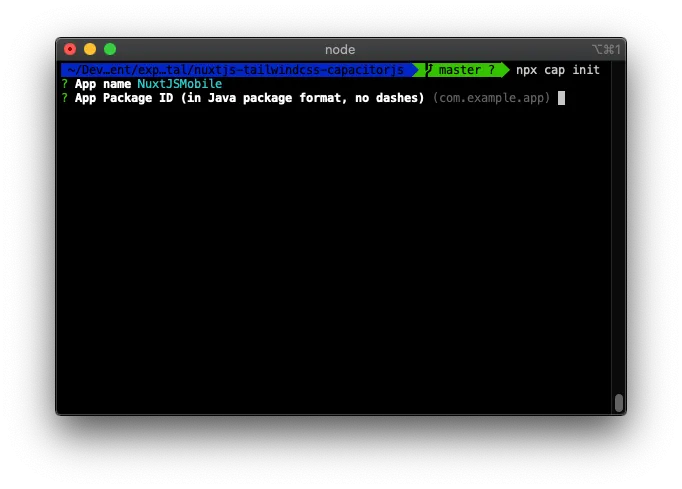
To kick of the initialization script, simply run:
npx cap init
Similar to the NuxtJS install, you will be prompted to enter a few pieces of information. The most important is your app id. According to the documentation, this is the package name for Android and the bundle identifier for iOS.
After the script completes, you will have a brand new capacitor.config.json file at the root of your NuxtJS install. The basic install should look like this:
{
  "appId": "com.nuxtjsmobile.app",
  "appName": "NuxtJSMobile",
  "bundledWebRuntime": false,
  "npmClient": "npm",
  "webDir": "www",
  "plugins": {
    "SplashScreen": {
      "launchShowDuration": 0
    }
  },
  "cordova": {}
}
Let's dive in a little bit to this file and set up some configuration.
Step 3: Set webDir
This is the most important setting that links NuxtJS to CapacitorJS! In your CapacitorJS file, you will see a webDir setting. By default this is set to www. We want to change that to be dist:
{
  "appId": "com.nuxtjsmobile.app",
  "appName": "NuxtJSMobile",
  "bundledWebRuntime": false,
  "npmClient": "npm",
  "webDir": "dist",
  "plugins": {
    "SplashScreen": {
      "launchShowDuration": 0
    }
  },
  "cordova": {}
}
Why did we do that? Because when NuxtJS has been generated (npm run generate) the final compiled directory needed for deployment is the /dist directory. This is our compiled code ready for deployment! We will be packaging this directory into our mobile app.
Speaking of mobile platforms, let's add a few.
Step 4: Add iOS
To add iOS to your NuxtJS app, simply run the following command:
npx cap add ios
This command will set up an XCode project with all of the plugins required to make CapacitorJS work. If you look at your directory structure, you will see a new /ios directory. This is where all of your native code will live!
Step 5: Add Android
Very similar to iOS, you just have to run the following command:
npx cap add android
At the root of your NuxtJS install you will see an /android directory. This is where all of your native Android code will live.
How Does This Work?
Well your development will take place like any normal NuxtJS development. You will add your pages, components, functionality within your NuxtJS install. You will then build your app with npm run build then npm run generate. Your app will then be added to the /dist directory.
After that, you will run the following command:
npx cap copy
This is an extremely important command. It will copy all of your web code from the /dist directory into the appropriate native app directories. You can then make any platform specific modifications in the IDE for each platform (Android Studio for Android and XCode for iOS). By configurations, this should be simply your deployment credentials, keys, or any permissions you will be requesting in your app. Native functionality should be implemented through a CapacitorJS plugin and developed in one spot.
Step 6: Update iosScheme
I like to do this right away when you get started with a new CapacitorJS app, especially if you plan on implementing Deep Linking. What this does is allows you to set a scheme in which users can link specifically within your app. For example, if you are familiar with ROAST, the app we used as an example for our book, we have the scheme set to roastandbrew. What this means is the internal protocol will be roastandbrew://.
To set this, add the following key to your capacitor.config.json:
"server": {
    "iosScheme": "nuxtmobile"
}
Now you have a nice protocol set up for your app that allows you to link directly to it from other sources.
Run Your App!
In reality, we have everything set up! However, to make your NuxtJS app feel more like a mobile app and look more like a mobile app, there are a few pieces we should implement. If you really want to run your application, you can run the following commands:
npx cap copy
This will ensure that your app is up to date with the code you have written. Next, run this command:
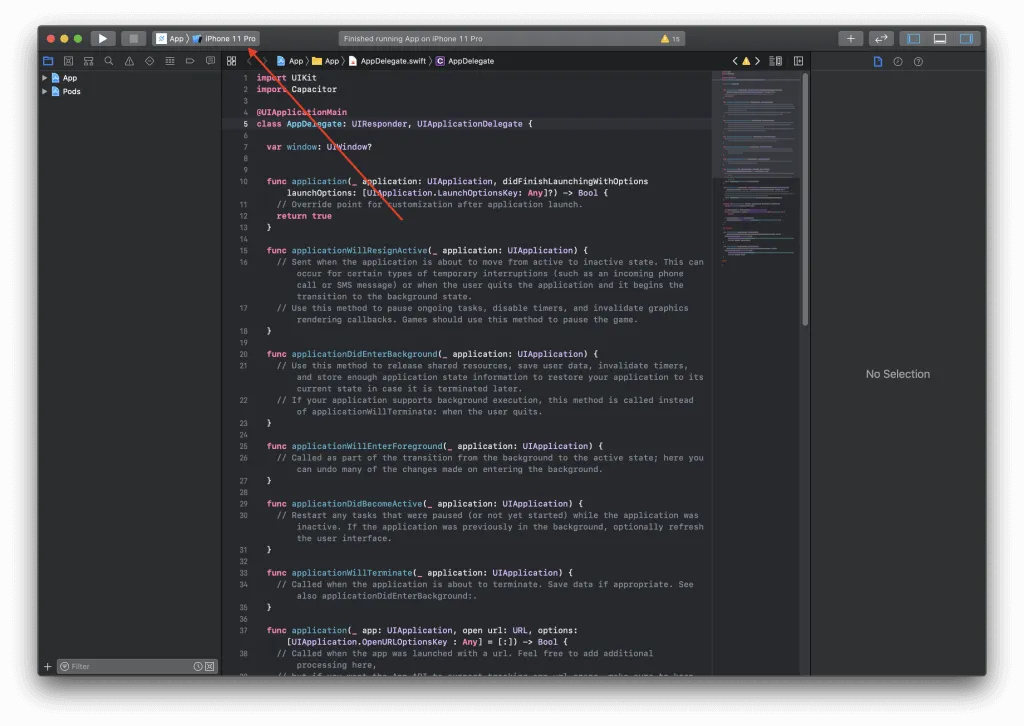
npx cap open ios
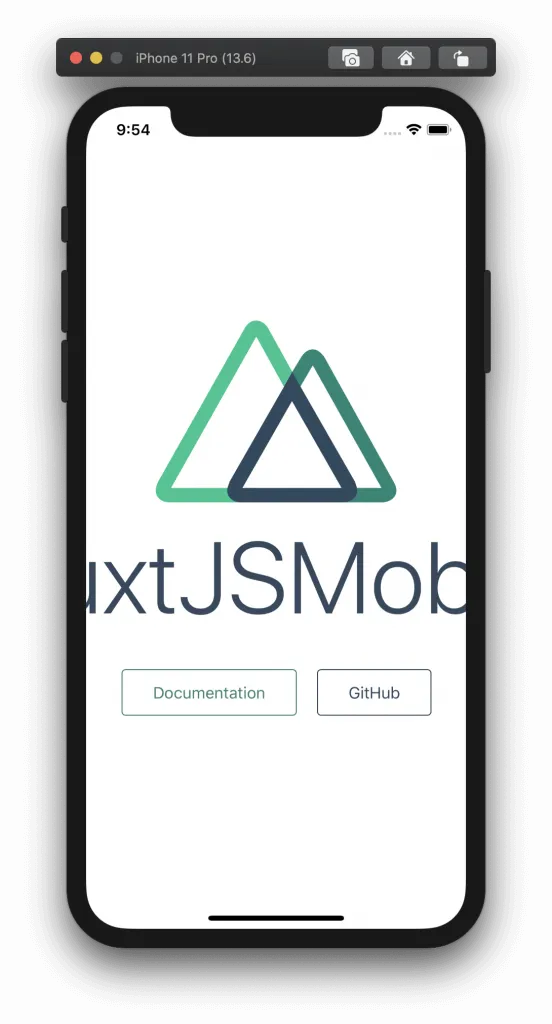
This will open up your XCode project. From there, all you have to do is click the play button in the top bar and select your target device!
You will see your NuxtJS app in the simulator after it compiles through XCode. Right now, it should look like this:
The final workflow to build your app will be:
npm run buildto build your NuxtJS appnpm run generateto package your NuxtJS app for static deploymentnpx cap copyto copy your built app to the iOS and Android Workspacesnpx cap open iosornpx cap open androidto open your app and debug in the native IDE for the platform.
It's awesome that we have our app ready to rock and roll, but it looks like we have a few visual aspects we should take care of! In the next section, we will go through some tips to allow you to use TailwindCSS to design your app which will really clean up how it looks and operates!
If you have any questions, definitely reach out in the comment section below! Want to learn how to build a web app and a mobile app AND write the entire API, check out our book. We will go through the entire process much more in-depth and show you the tips and tricks necessary to make a web and mobile application using the same codebase!
Want to work together?
Professional developers choose Server Side Up to ship quality applications without surrendering control. Explore our tools and resources or work directly with us.

Join our community
We're a community of 3,000+ members help each other level up our development skills.
 Join our Discord
 Platinum Sponsors

Active Discord Members
We help each other through the challenges and share our knowledge when we learn something cool.
Stars on GitHub
Our community is active and growing.
Newsletter Subscribers
We send periodic updates what we're learning and what new tools are available. No spam. No BS.
Sign up for our newsletter
Be the first to know about our latest releases and product updates.
We're a community empowering product builders with self-hosted tools and open source solutions.