
 Hire Us
I've been using Media Temple for hosting and overall it has been a very pleasant experience. There are some things that are a little inconvenient, especially things like no native support for a Media Temple Amazon S3 backup. You can't blame Media Temple for that though... it's mainly a Plesk thing. Fortunately enough, Plesk stays enough out of your way where you can set this up on your own. We can utilize free tools from Amazon to automate backups from MediaTemple DV 4.5 servers.
DISCLAIMER Media Temple recently has shifted their policies to frown upon root access. They don't care too much about it, they just have been a little more stingy recently with giving you support on things that are not native with Plesk (understandable). Be sure that you make a backup of everything through their Snapshot tool or the native Plesk Backup Manager before moving forward.
Enable Root Access
Now since I've got the legal mumbo-jumbo taken care of, lets put the rubber to the asphalt by making sure that you have root access. We will be making changes to the system that require higher permissions, so if you are not doing this with the root account -- we won't be getting too far. By default, new Dedicated Virtual servers are shipped with root access disabled. You can do this in the Account Center at Media Temple.

When you click on that, you will need to configure BOTH items. This means you will have to enable root access and install the Developer Tools.
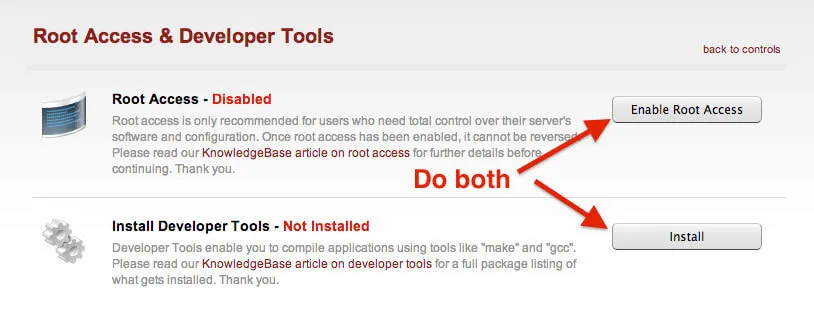
This may take a minute or two for this to complete. That's okay, it is a perfect amount of time to grab a coffee/beer and come back to a screen with green text saying "Enabled" and "Installed".
Download and Install Amazon AWS CLI Tools
Now that we have the correct access and libraries to do some compiling, we need to download Amazon AWS CLI Tools. These tools will allow us to connect to Amazon's services without installing all of this weird poo poo to get connected (been there, done that). Servers generally do not like poo poo so it is important that these tools are officially supported by Amazon and they do not make Plesk crap itself.
Before we dive in and start running Amazon commands, to the date of this post these tools do require Python 2.6 or higher. To do that, simply run the python --version command to see what version you are running. It should echo out the version on the line below.
Check Python Version (must be 2.6 or higher)
[root@myserver ~]# python --version
Python 2.6.6
Sweet, it looks like I am good to go on this server. Now we have to download the tools... OH WAIT! There's more! Remember my line above where I said we do not have to download a bunch of weird poo poo? We do have to download something called pip (which is a package manager for Python), but trust me -- this is very safe based off of the other methods that I have seen. Pip will simplify the installation process for us.
Install pip (Python Package Manager)
wget --no-check-certificate https://raw.github.com/pypa/pip/master/contrib/get-pip.py; python get-pip.py
Sweet! We have pip installed on our server, so lets use pip to install Amazon's CLI Tools:
Install Amazon AWS CLI Tools
pip install awscli
Well, that was quite simple... check for errors, but if everything looks good -- we are now ready to prepare our connection to Amazon S3.
Configure Amazon Access
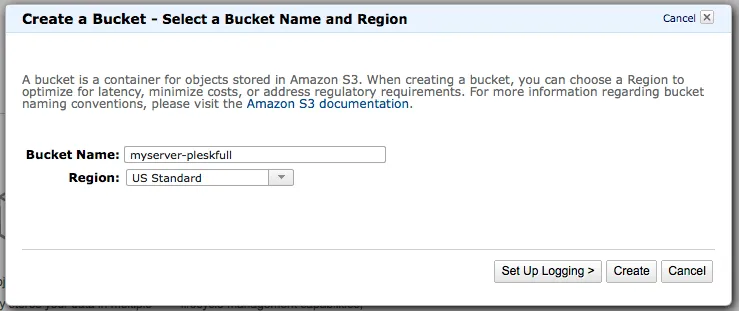
Before we start hacking away to get this server connected, we need to make sure that we have S3 buckets created and the right credentials to run a backup. Log into Amazon AWS. Once you are logged in, then proceed to click on S3 then you should be able create your Amazon S3 bucket using the on-screen prompts.
In this example, I will be using a bucket named myserver-pleskfull, but your bucket name must be original and not conflict with any other bucket names on Amazon S3. Whatever you name this bucket, we will configure full server Plesk backups to go into this bucket. Make sure you change my code to whatever your bucket name is as you progress through the article.
Best Practice Note If this Amazon account is only going to be accessed by one user, one server, only one user has root access to your server, and any Amazon buckets will be used only to store backups for this server... then you can proceed further down this post. If this is an existing account and you have multiple users, multiple servers, and/or you just want heightened security -- then I would definitely configure policies and different security settings through Amazon IAM (Amazon Identity and Access Management). Configuring correct bucket access can help you prevent malicious users, software, etc. from gaining access to ALL of your buckets if you lock them down individually. Since I don't want to go on a tangent talking about IAM, read that link for the AWS IAM Best Practices.
Create Access Keys
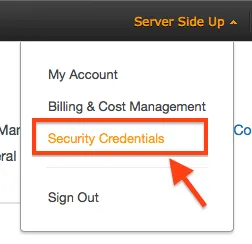
When you are logged into the AWS Console, click on your name and then choose security credentials.
Then choose Create New Access Key:
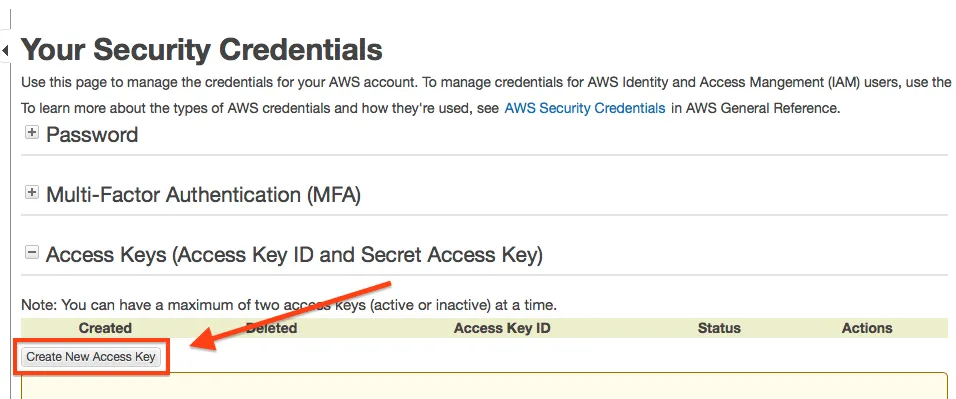
When you create the keys, be sure to download them -- because you will NEVER see them again otherwise!
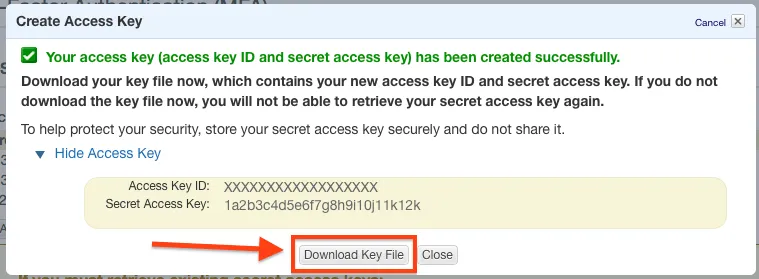
Once you have that downloaded, run aws configure you will be prompted to enter your credential information:
[root@myserver ~]# aws configure
AWS Access Key ID [None]: XXXXXXXXXXXXXXXXXXXX
AWS Secret Access Key [None]: 1a2b3c4d5e6f7g8h9i10j11k12k
Default region name [None]: us-east-1
Default output format [None]:<LEAVE BLANK -- JUST PRESS ENTER>
For the default region, I chose us-east-1, but you can choose whatever region you would like by seeing the AWS regions and availability zones list. For what we are doing in the scope of this article, the regions are irrelevant to Amazon S3 but if you do any management of other AWS regions -- it may be very important to set this correctly. You can also see that I left Default output format [None]: blank. This will default to JSON. You can read more about your AWS CLI configuration options.
Test Amazon Access
Now that we have our authentication configured, you should now be able to test it out. Create some test files in your home folder:
[root@myserver ~]# mkdir -p test-parent-folder/
[root@myserver ~]# touch testfolder/test1.txt
If you run ll or ls -l you should see your folder there. Now lets run the command to move it up to our S3 Bucket. Remember the bucket name that we chose from above is myserver-pleskfull. The syntax for the aws command is the following:
aws [options] <command> <subcommand> [parameters]
Using the syntax above (advanced syntax can be found in the AWS CLI reference), we can now run our move command and watch its results:
[root@myserver ~]# aws s3 mv testfolder/ s3://myserver-pleskfull --recursive
move: testfolder/test1.txt to s3://myserver-pleskfull/test1.txt
Now when you check the bucket in the Amazon Console, you can see that it appears (notice how it copied just the file, not the folder):

You can also check via command line:
[root@myserver ~]# aws s3 ls s3://myserver-pleskfull-full --recursive
2014-04-03 12:13:13          0 test1.txt
Configure Full Server Backup
So this is going to be interesting on how this works... We are going to use the native Plesk Backup Manager, but we are going to choose the FTP solution and the server will essentially FTP the backup file to itself. Sounds very strange, but there are a few reasons why I did it this way which we will discover as we go through the set up.
Here is an image that essentially demonstrates our full server backup:
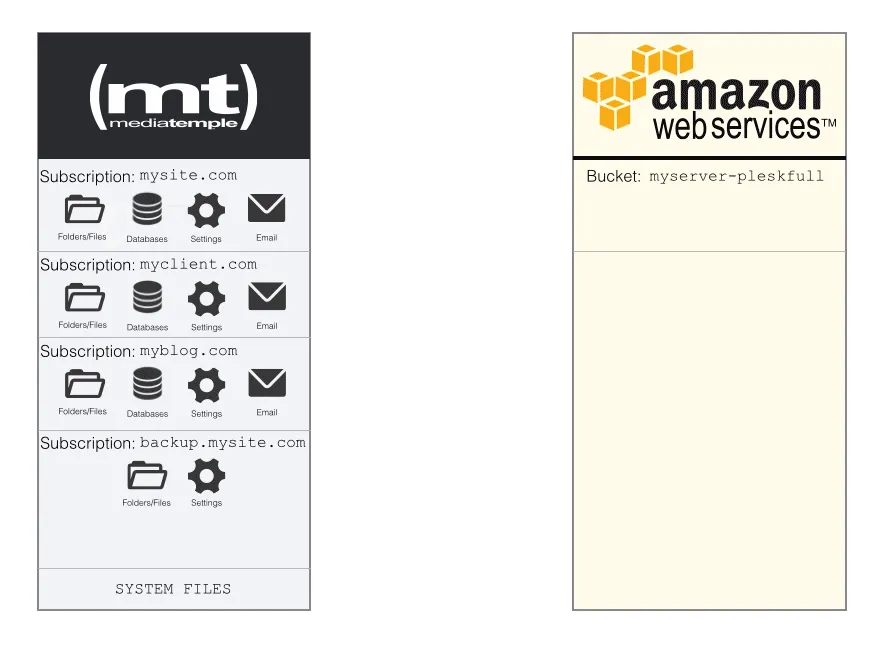
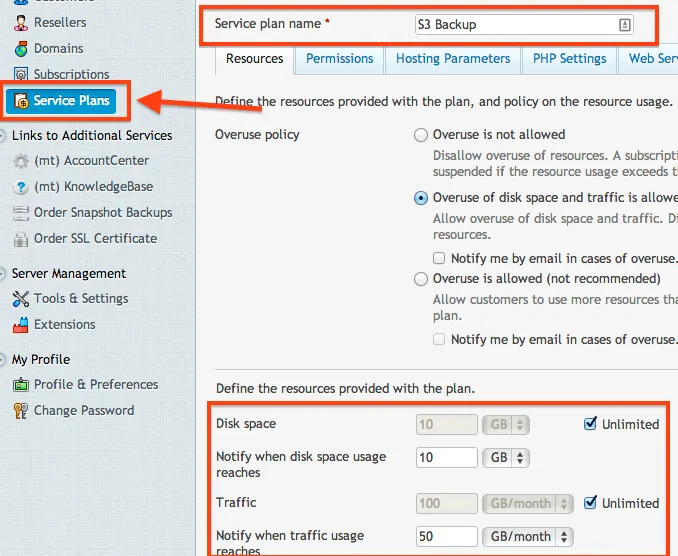
Now since we have the logic down, we have to create a Subscription to store our backups. But before we do that, we need to make sure that we have a Plan that will allow us to do that. Plesk would get quite emotional if we tried to store our 5GB backup in a plan that only allowed 1GB. To do this, select Service Plans, choose Add New Plan. Set the name to S3 Backup and make sure that you allow Unlimited storage a subscription and Traffic (you can choose whatever subdomain that you want). It would also be a wise choice to set the notifications to make sure that your subscription does not get out of control. Set these values to whatever you think suits your server best. Since our backups will be MOVED (not copy) to Amazon S3, we don't have to worry about the subscription keeping an archive of backups.
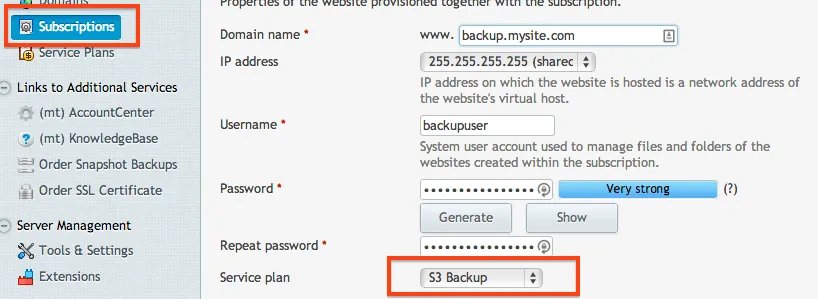
Once you have the Service Plan created, it's now time to create the Subscription. You can use any domain that you would like, but it just has to exist and have the DNS properly pointed to your server's IP address. Once you have your domain configured, create the Subscription and assign it to the new plan that we created.
Once the subscription is created, let's lock down that subscription so we don't have any data leaks. We won't be needing any web hosting, only FTP:
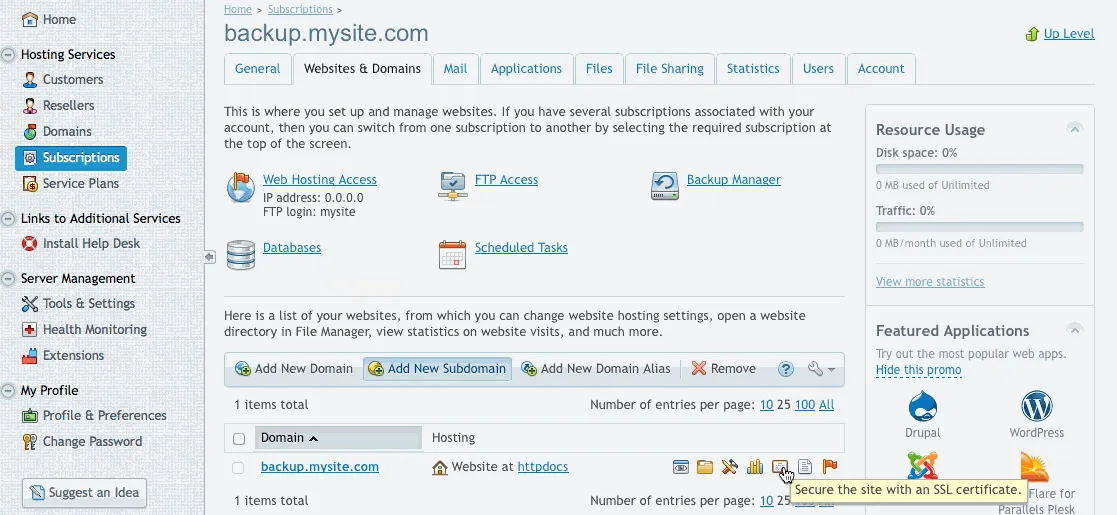
Now that we have the web hosting disabled, we can create our directories for our backup (be sure to change the path to the domain name that you chose):
mkdir -p /var/www/vhosts/backup.mysite.com/s3backups/fullserver
Before we get too excited, we need to make sure that our backupuser has ownership of the s3backups folder.
chown -R backupuser:psacln /var/www/vhosts/backup.mysite.com/s3backups/
This directory that we just created is what we will be using to store our full server backups. We now need to create an FTP account that will have access only to this directory.
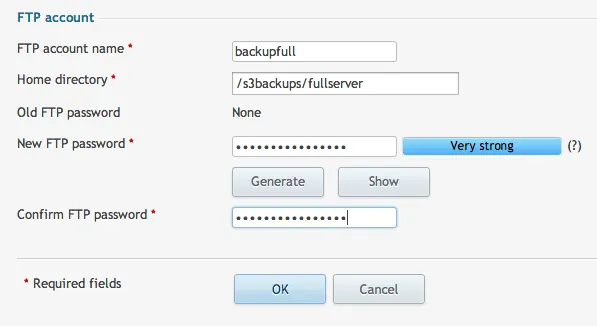
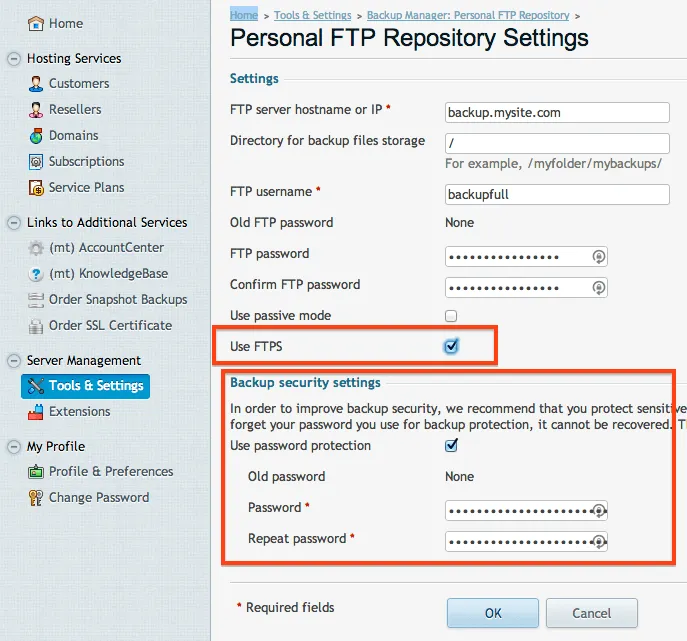
The user is now configured, but we need to tell our server where to run the backup. Go to Tools & Settings and then choose Personal FTP Settings. Here is where you can enter in the information that we just created. When you are filling this out, be sure to select FTPS. Even though we are sending it to ourselves, we want to make sure that we use FTPS to secure the transfer. Also, it is a wise idea to create an archive password. This is another step that will prevent unauthorized hands from getting on your data. Be sure to save these passwords in a safe place!:
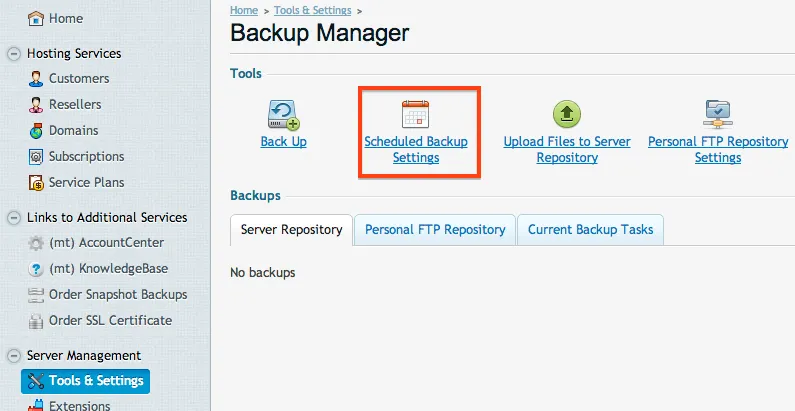
With the FTP settings set, we can now schedule our backup to run. Choosing the frequency of the backup is all up to you. Yes, Amazon is only pennies per GB, but it can add up fast if you are running large backups frequently. Go back to the Backup Manager then choose Scheduled Backup Settings.
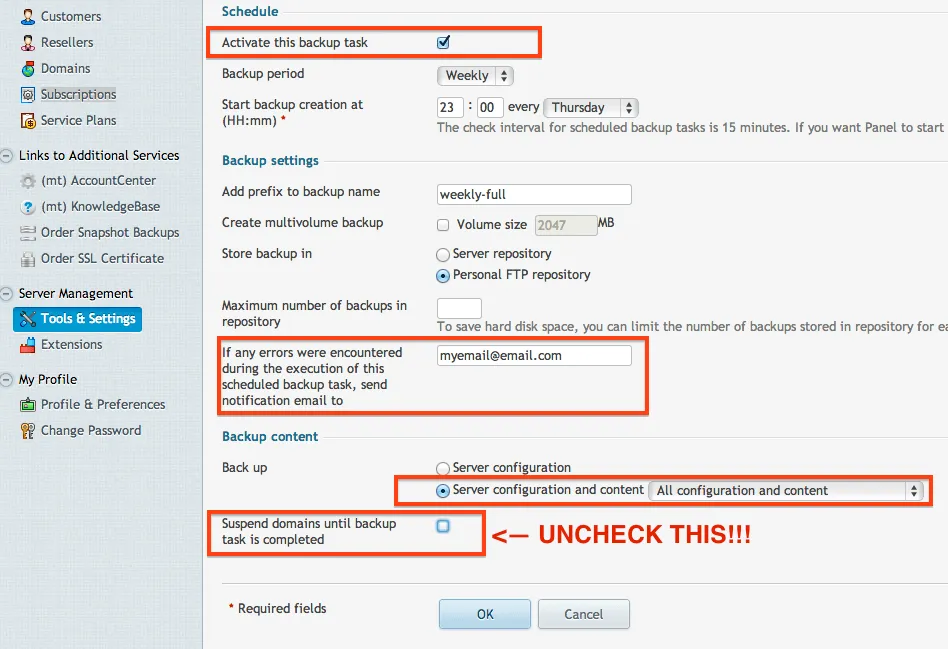
When you are configuring your settings, be sure that you click Activate at the top (many people forget to select that). Fill out the other fields anyway you want, but you can put in your email for notifications upon any errors (very good idea). Also, make sure that you select All Configuration and Content and make sure you uncheck the domain suspension. This will disable your sites while the backup runs. Only in special cases would you want that to happen.
Testing The Backup
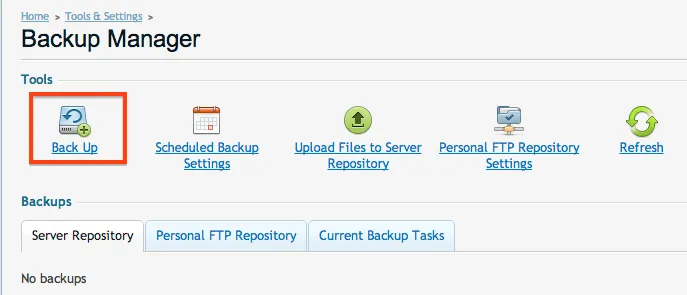
We're almost there! Now we can test it by choosing Backup from the Backup Manager.
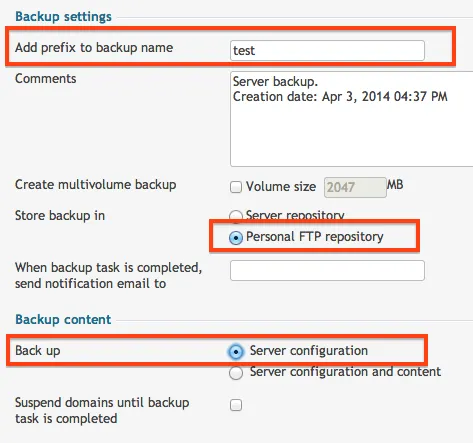
Here is where we can run our first test. Instead of backing up everything, lets just back up the server configuration. This will save A LOT of time in testing.
It will start to run a backup. This is your cue to go grab another coffee/beer while it finishes. Once it is complete, you will see it appear in the Personal FTP tab:
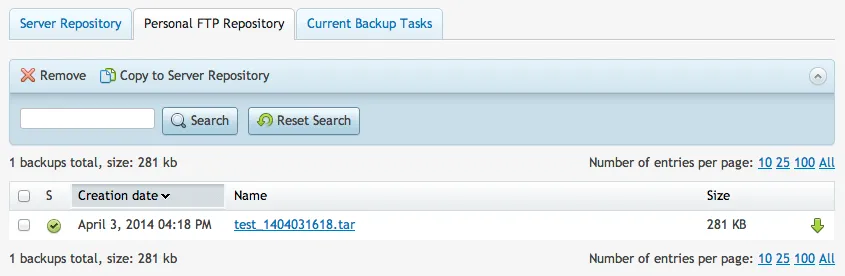
Since that backup is done, lets see where it is at. We can check by running the ll or ls command.
[root@myserver ~]# ll /var/www/vhosts/backup.mysite.com/s3backups/fullserver
total 284
-rw-r--r-- 1 backupuser psacln 287916 Apr  3 16:18 test_1404031618.tar
Now since the file is there, lets move it to Amazon S3. This is going to be the same command as our test from before, but we need to change the directory to the fullserver directory. You will see its output as it moves the file.
[root@myserver ~]# aws s3 mv /var/www/vhosts/backup.mysite.com/s3backups/fullserver/ s3://myserver-pleskfull --recursive
move: ../var/www/vhosts/backup.mysite.com/s3backups/fullserver/test_1404031618.tar to s3://myserver-pleskfull/test_1404031618.tar
We can now list out the directory on the Amazon S3 bucket to confirm our file made it safely. When I run the command, you can see it shows our test text file as well:
[root@myserver ~]# aws s3 ls s3://myserver-pleskfull --recursive
2014-04-03 12:13:13          0 test1.txt
2014-04-03 16:47:19     287916 test_1404031618.tar
Automating The Process
We have made it this far, but it would be really pointless if this was not automated. Fortunately, Linux allows us to run a script every hour to check if there is a new backup. If there is a backup, then it will then execute the move to Amazon S3. Our script will be located in /etc/cron.hourly/. Create the file using nano and be sure to NOT have .sh at the end of the filename (otherwise it will not execute).
nano /etc/cron.hourly/aws-s3move
Here is the code that we can use to check our directory:
#!/bin/bash

# Set the path to the backup directory
BACKUP_DIR="/var/www/vhosts/backup.mysite.com/s3backups/fullserver"
S3_BUCKET="myserver-pleskfull"

# Check if there are any files in the backup directory
if [ "$(ls -A $BACKUP_DIR)" ]; then
    # Move all files to S3
    aws s3 mv $BACKUP_DIR/ s3://$S3_BUCKET --recursive
fi
Write the file out with nano and then set the file permissions so our script can be executed:
chmod 755 /etc/cron.hourly/aws-s3move
Since our script is now executable, it is now ready for a test run. Run another backup (like what we did before -- just the server configuration). Only this time when it completes, we will run our script. When you run it via BASH, you should see the results below:
[root@myserver ~]# bash /etc/cron.hourly/aws-s3move
move: ../var/www/vhosts/backup.mysite.com/s3backups/fullserver/test_1404031716.tar to s3://myserver-pleskfull/test_1404031716.tar
Restore From A Backup
The most important piece in a backup process is the restoration. For most people, it's usually the least tested piece of the process. To get this to work, we are just going to copy the file that we want back into our FTP folder. Make sure you change backup-file.tar to your actual file name that you want.
aws s3 cp s3://myserver-pleskfull/test_1404031618.tar /var/www/vhosts/backup.mysite.com/s3backups/fullserver
We will get the results below:
[root@myserver ~]# aws s3 cp s3://myserver-pleskfull/test_1404031618.tar /var/www/vhosts/backup.mysite.com/s3backups/fullserver/
download: s3://myserver-pleskfull/test_1404031618.tar to ../var/www/vhosts/backup.mysite.com/s3backups/fullserver/test_1404031618.tar
Once you have it in the FTP folder, you should now be able to copy it to your server repository. (It will ask you for your restore password, so I hope you wrote that down!):
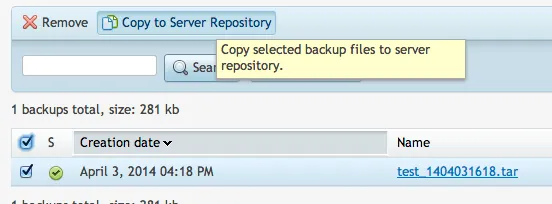
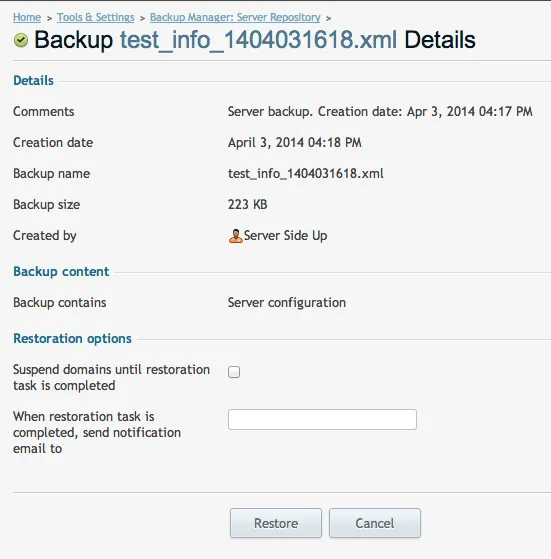
Then once it is in your server repo, you can click on that file to initiate the restore:
Want to work together?
Professional developers choose Server Side Up to ship quality applications without surrendering control. Explore our tools and resources or work directly with us.

Join our community
We're a community of 3,000+ members help each other level up our development skills.
 Join our Discord
 Platinum Sponsors

Active Discord Members
We help each other through the challenges and share our knowledge when we learn something cool.
Stars on GitHub
Our community is active and growing.
Newsletter Subscribers
We send periodic updates what we're learning and what new tools are available. No spam. No BS.
Sign up for our newsletter
Be the first to know about our latest releases and product updates.
We're a community empowering product builders with self-hosted tools and open source solutions.