
 Hire Us
How to set up WireGuard VPN server on Ubuntu 20.04
Jay Rogers
May 22nd, 2020

This post is a continuation of my free mini-course on Gain flexibility & increase privacy with WireGuard VPN. This post focuses on installing WireGuard VPN Server on Ubuntu 20.04 only.
If you are new to WireGuard VPN, I highly encourage you to start from the top. If you are all set, let's get to it!
What we're talking about
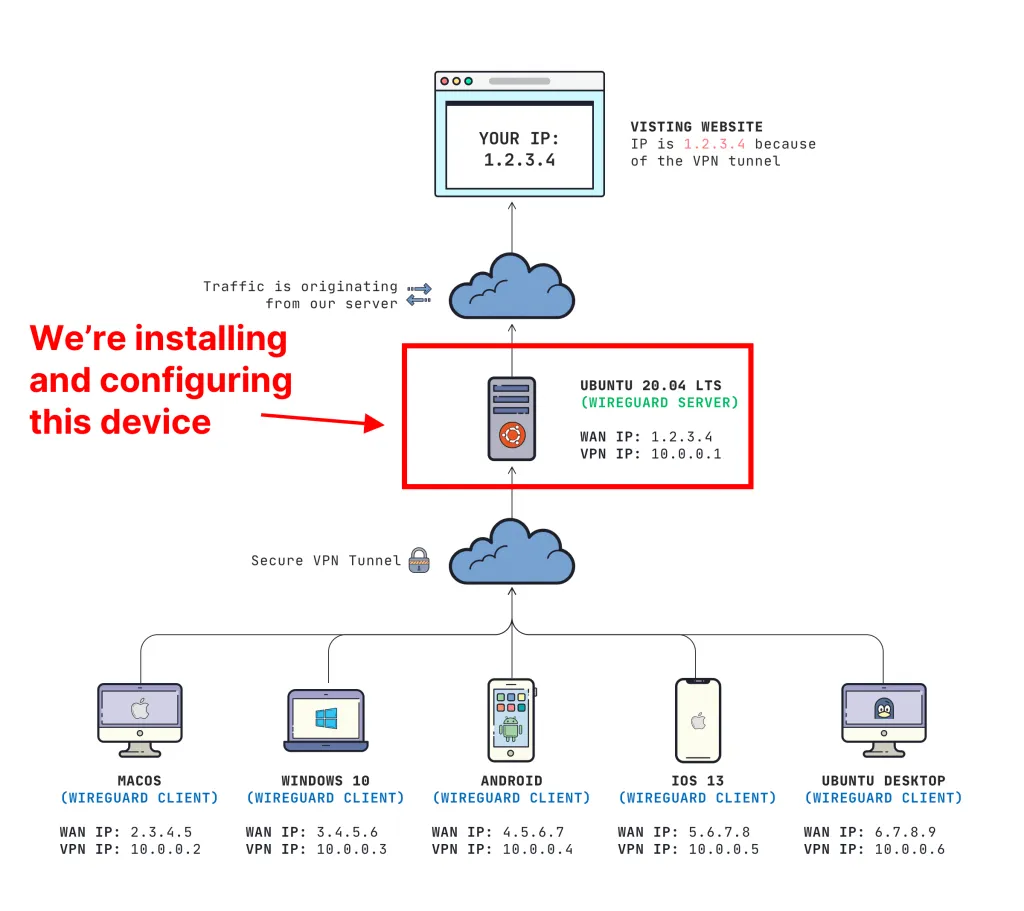
This post covers how to configure the WireGuard VPN server. All of our clients will connect to this machine first, then route out to the Internet. This is what it looks like:
Prerequisites
We will be installing WireGuard VPN on a brand new Ubuntu 20.04 LTS server. I assume you have:
- A server (you can get a server for $5 with Digital Ocean, Vultr, or Linode)
- Root access
- Ability to open firewall ports (if you have a separate firewall that sits in front of your server)
Prepare your server
Once you have your server up and running, connect via SSH. Always run updates before running any installations.
sudo apt update && sudo apt upgrade
Check to see if your server needs a reboot:
cat /var/run/reboot-required
If it comes back with *** System restart required ***, then you need to restart your server:
sudo reboot
Install WireGuard VPN Server
Since we are on the latest version of Ubuntu 20.04, the install is very easy:
sudo apt install wireguard
It is possible to install this on Ubuntu 18.04 too, but you will need to follow the Ubuntu ≤ 19.04 steps listed on WireGuard's website.
Generate server keys
Just like SSH, we need a pair of public and private keys in order for our server to work.
sudo mkdir -p /etc/wireguard/keys; wg genkey | sudo tee /etc/wireguard/keys/server.key | wg pubkey | sudo tee /etc/wireguard/keys/server.key.pub
This places our keys under our /etc/wireguard/keys directory that we created. DO NOT share your private key with anyone else, otherwise your VPN will be compromised.
We will need to reference the private key for configuration in the future. You can view your private key by running the cat command:
cat /etc/wireguard/keys/server.key
Determine your "default" interface
We will need to know what is your default network interface for connecting to the Internet. Run this command to find out:
ip -o -4 route show to default | awk '{print $5}'
Mine returned back eth0, so I will be using eth0 for my interface in the rest of the guide.
Configure the "wireguard interface"
WireGuard works by adding a network interface to our server. Just like how we saw eth0 before, we will be adding a network interface called wg0.
We need to create a file called /etc/wireguard/wg0.conf
sudo nano /etc/wireguard/wg0.conf
Contents of /etc/wireguard/wg0.conf:
[Interface]
Address = 10.0.0.1/24
ListenPort = 51820
PrivateKey = YOUR_SERVER_PRIVATE_KEY
PostUp = iptables -A FORWARD -i %i -j ACCEPT; iptables -t nat -A POSTROUTING -o eth0 -j MASQUERADE
PostDown = iptables -D FORWARD -i %i -j ACCEPT; iptables -t nat -D POSTROUTING -o eth0 -j MASQUERADE
SaveConfig = true
IMPORTANT: You need to replace YOUR_SERVER_PRIVATE_KEY and set the default interface on PostUp and PostDown (mine is eth0 in this example).
TO SAVE: While in nano, press CTRL + O to save and CTRL + X to quit.
If you want to know what the heck these configuration options mean, I go through these configuration options in detail in an earlier post. I would recommend reading that if you want to learn more.
Set proper permissions
We need to make sure that our configuration and private key are only accessible by the root user.
sudo chmod 600 /etc/wireguard/wg0.conf /etc/wireguard/keys/server.key
Bring up the "wireguard interface"
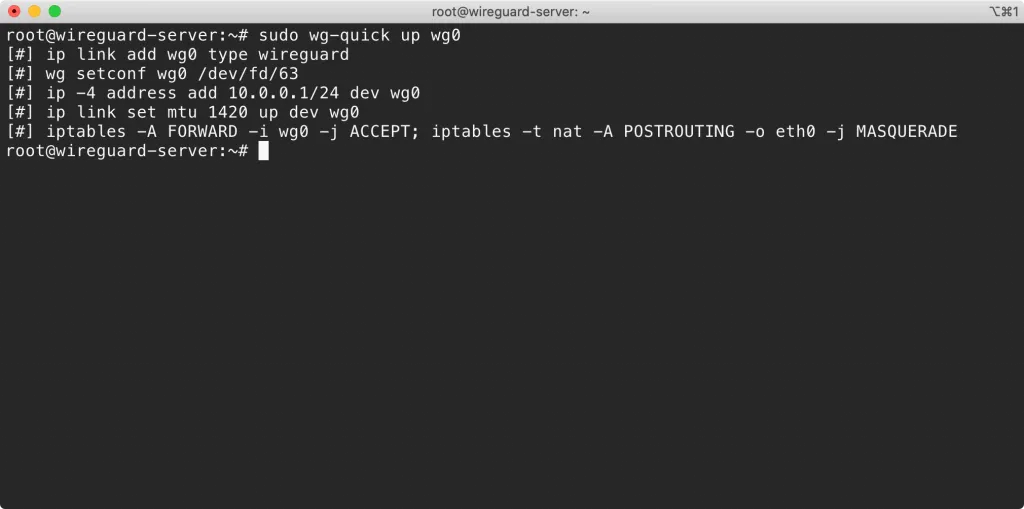
Run this command to "bring up" the wg0 interface we just created:
sudo wg-quick up wg0
You should get output similar to the screenshot below
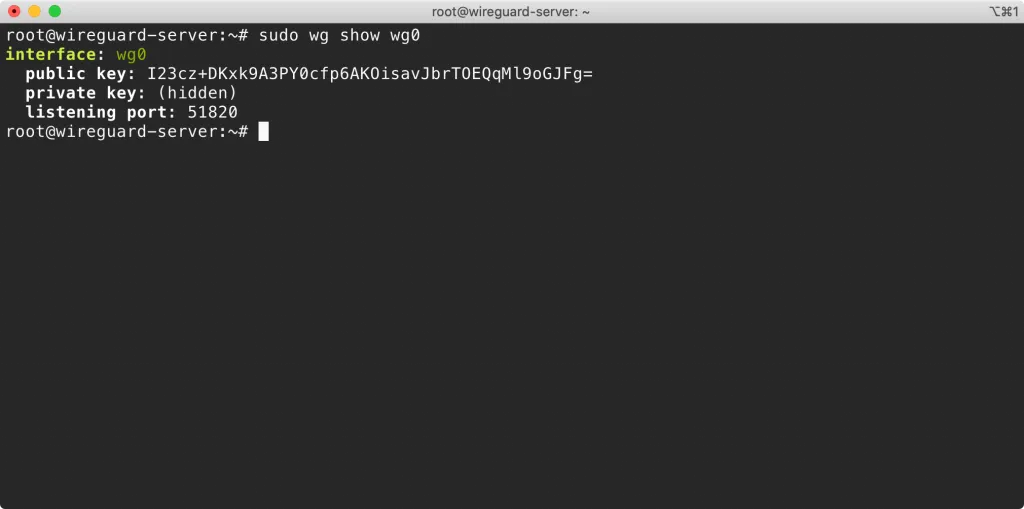
We can check the status of the wg0 interface by running this command:
sudo wg show wg0
Start the "wireguard interface" automatically at boot
We can have the server automatically bring up the wg0 VPN interface at boot:
sudo systemctl enable wg-quick@wg0
Configuring server networking & firewall
We need to allow traffic forwarding in order for the VPN to work correctly.
Allow traffic forwarding
We will need to modify the /etc/sysctl.conf file.
sudo nano /etc/sysctl.conf
You need to uncomment the line that says net.ipv4.ip_forward=1. It should look like this:
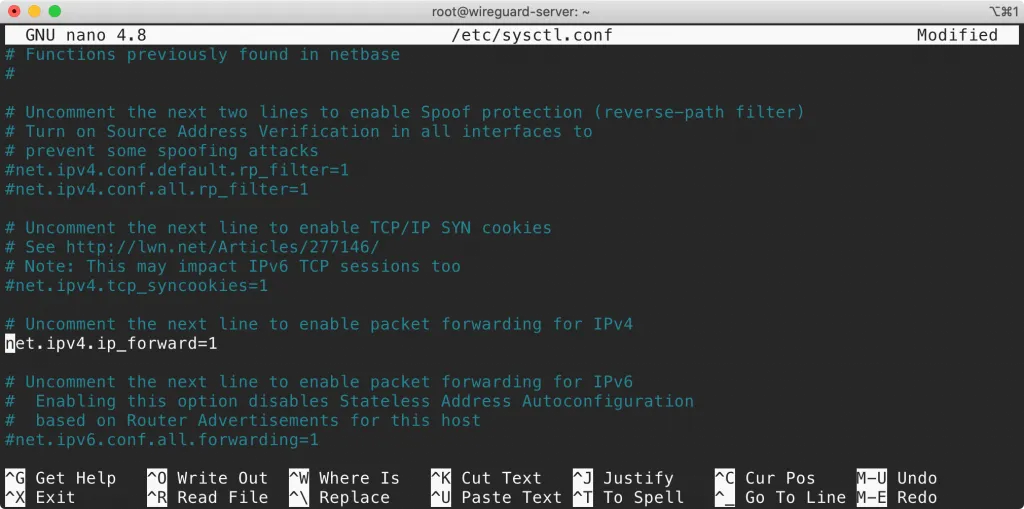
TO SAVE: While in nano, press CTRL + O to save and CTRL + X to quit.
Apply our changes after saving:
sudo sysctl -p
Open the WireGuard server port
In our config file, we set our listening port to 51820. This uses UDP, so we will need to open that port on the built-in Ubuntu software firewall on our server using ufw.
sudo ufw allow 51820/udp
Let's allow SSH too:
sudo ufw allow 22/tcp
Now enable the firewall:
sudo ufw enable
You can verify everything by checking the status
sudo ufw status verbose
If you have a hardware firewall in front of your server, you will need to open up the UDP port on your firewall/router.
Adding clients
Your server is now ready to add clients. Before you do that, it is important to understand how authentication works. I cover the important concepts in an earlier post, but what I want to illustrate for you right now is that we do need to add the client's public key to our server. Without this, anyone would be able to connect.
The "quick solution" to this is to run this command on your server the wg set command on your server:
sudo wg set wg0 peer YOUR_CLIENT_PUBLIC_KEY allowed-ips YOUR_CLIENT_VPN_IP
IMPORTANT: You need to replace YOUR_CLIENT_PUBLIC_KEY and YOUR_CLIENT_VPN_IP
If the "quick solution" is not enough, I have specific instructions how to configure each type of client. Pick what you need:
- Set up WireGuard client on Windows 10
- Set up WireGuard client on macOS Catalina
- Set up WireGuard client on iOS 13
- Set up WireGuard client on Android
Up next
I'm so thankful to see how easy it is to configure WireGuard on Ubuntu 20.04. The native kernel integration and having the package directly in the Ubuntu repositories makes it easy to get a server up and running!
If you want to learn more about WireGuard VPN, check out the entire "mini-course".
Hope you found this guide useful! If you have any questions, drop them in the comments below. You can always hit me up on Twitter or join our mailing list if you want to see more content like this.
Want to work together?
Professional developers choose Server Side Up to ship quality applications without surrendering control. Explore our tools and resources or work directly with us.

Join our community
We're a community of 3,000+ members help each other level up our development skills.
 Join our Discord
 Platinum Sponsors

Active Discord Members
We help each other through the challenges and share our knowledge when we learn something cool.
Stars on GitHub
Our community is active and growing.
Newsletter Subscribers
We send periodic updates what we're learning and what new tools are available. No spam. No BS.
Sign up for our newsletter
Be the first to know about our latest releases and product updates.
We're a community empowering product builders with self-hosted tools and open source solutions.