
 Hire Us
Validating an API request with Javascript and Laravel
Dan Pastori
October 30th, 2017
In the last tutorial (/api-form-submissions-javascript-vuex-laravel/) we added a simple way for users to add a Cafe to Roast and Brew. As of right now, it works great! However, the user can submit anything into any form field or nothing at all and a Cafe record will be added. We need to validate this API request on both the Javascript front end and the Laravel back end. Luckily Laravel has a super sweet tool built in for validating incoming data using Laravel Validators: Validation - Laravel - The PHP Framework For Web Artisans. We will be using these validator son the route.
Step 1: Open the NewCafe.vue Component and Add Placeholders for Validations
We will begin by making sure our form is validated. This is only part of the issue since a user with a token can easily submit a POST request with invalid data and it will be accepted. This will at least stop a whole bunch of invalid data requests and enhance UX when adding a new cafe.
First, I usually add a validations object to the data returned from the component. I make one for each of the data pieces we are validating. Your data should look like this:
data(){
  return {
    name: '',
    address: '',
    city: '',
    state: '',
    zip: '',
    validations: {
      name: {
        is_valid: true,
        text: ''
      },
      address: {
        is_valid: true,
        text: ''
      },
      city: {
        is_valid: true,
        text: ''
      },
      state: {
        is_valid: true,
        text: ''
      },
      zip: {
        is_valid: true,
        text: ''
      }
    }
  }
},
We now have validation placeholders for each of the pieces of data we are collecting. In each piece of data we have an is_valid field which is set to true by default and an empty text field that we can fill with the validation text.
Step 2: Add Validation Notifications
Next, we have to add notifications to the user of invalid data. I do this with <span> elements that get shown if the data is not valid. For example, the validation for the name field should look like this:
<span class="validation" v-show="!validations.name.is_valid">{{ validations.name.text }}</span>
What this does is show the validation if it's flagged as invalid. It also displays the text for an invalid name field. This way we can flag the field as invalid and display custom text if needed. Sometimes a field can be invalid for many reasons, so having a variable for the text helps a ton.
I also added a simple component to the /resources/assets/sass/components directory called _validations.scss . It just styles the validation span as a block and text red. I also included it in /resources/assets/sass/app.scss so check it out on https://github.com/serversideup/roastandbrew.
Step 3: Build JS Validation Function
This is how we validate a new cafe. I make the validation function pretty simple. Honestly there are a million different ways to implement your validations, so pick what you feel most comfortable with. This is usually the way I approach it.
First, define what valid data looks like for each entity: 1. name: A string must be entered 2. address: A string must be entered. 3. city: A string must be entered. 4. state: A string must be entered. 5. zip: A string must be entered and must be a proper zip code format.
Our data right now is not too complex, but as we add features this will be come more and more complex.
Next, simply add a method to the methods object on the NewCafe.vue component:
validateNewCafe(){

}
Next, initialize a variable that determines if the new cafe form is valid and set it to true. This way, if we come across invalid data, we flag it as false and don't submit the request. We then return the variable.
validateNewCafe(){
  let validNewCafeForm = true;

  return validNewCafeForm;
}
Now we wrap our functionality in the submitNewCafe() method with our validation method. This way the functionality only gets called if the form is valid:
submitNewCafe(){
  if( this.validateNewCafe() ){
    this.$store.dispatch( 'addCafe', {
      name: this.name,
      address: this.address,
      city: this.city,
      state: this.state,
      zip: this.zip
    });
  }
},
Now we implement our validation checks. Our validateNewCafe() method should look like:
validateNewCafe(){
        let validNewCafeForm = true;

        /*
          Ensure a name has been entered
        */
        if( this.name.trim() == '' ){
          validNewCafeForm = false;
          this.validations.name.is_valid = false;
          this.validations.name.text = 'Please enter a name for the new cafe!';
        }else{
          this.validations.name.is_valid = true;
          this.validations.name.text = '';
        }

        /*
          Ensure an address has been entered
        */
        if( this.address.trim() == '' ){
          validNewCafeForm = false;
          this.validations.address.is_valid = false;
          this.validations.address.text = 'Please enter an address for the new cafe!';
        }else{
          this.validations.address.is_valid = true;
          this.validations.address.text = '';
        }

        /*
          Ensure a city has been entered
        */
        if( this.city.trim() == '' ){
          validNewCafeForm = false;
          this.validations.city.is_valid = false;
          this.validations.city.text = 'Please enter a city for the new cafe!';
        }else{
          this.validations.city.is_valid = true;
          this.validations.city.text = '';
        }

        /*
          Ensure a state has been entered
        */
        if( this.state.trim() == '' ){
          validNewCafeForm = false;
          this.validations.state.is_valid = false;
          this.validations.state.text = 'Please enter a state for the new cafe!';
        }else{
          this.validations.state.is_valid = true;
          this.validations.state.text = '';
        }

        /*
          Ensure a zip has been entered
        */
        if( this.zip.trim() == '' || !this.zip.match(/(^\d{5}$)/) ){
          validNewCafeForm = false;
          this.validations.zip.is_valid = false;
          this.validations.zip.text = 'Please enter a valid zip code for the new cafe!';
        }else{
          this.validations.zip.is_valid = true;
          this.validations.zip.text = '';
        }

        return validNewCafeForm;
      }
It simply checks to see that something is entered in every field and with the zip code, it checks to see if it matches a valid postal code. If the field is not valid, we set the is_valid for that field to false which will show the validation. We will also set the text field to be the display for the validation. Lastly, we set the form as invalid so it doesn't submit. If you try to enter a blank field for any of the form fields, it should look like this:
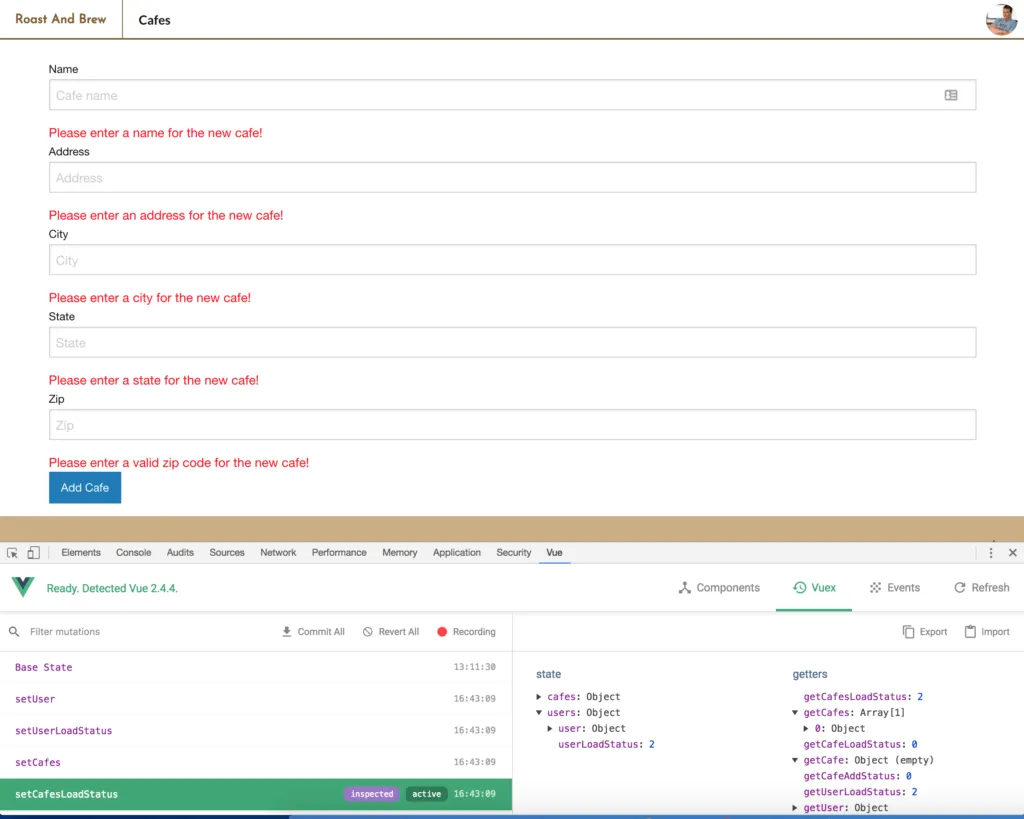
We are now error checking our form! Now we should do the serious validation on the API side so we can certify the data is valid before we save it.
Step 4: Build Laravel Request Validator for New Cafe
Now it's time to do the server side validation. This will ensure that any request to our endpoint, whether it comes through the form or not is validated before we add the data. Laravel has some sweet tools to make this really easy: Validation - Laravel - The PHP Framework For Web Artisans.
First we will make a new request, according to the documentation. So what we will do is run:
php artisan make:request StoreCafeRequest
This will create a request called StoreCafeRequest in our /app/Http/Requests directory. We will validate our new cafe request with this validator.
Next, open up /app/Http/Requests/StoreCafeRequest.php. In there you will find 2 methods by default. First is the authorize() method. This method grants the requester permission to run the request. Since we are validated by our token and the request is behind the auth:api middleware, we set this function up to return true. As long as the user is logged in they can add a new cafe.
The other method you see is the rules() method. This is where we define the validations for the incoming data. This is an array where there's a key which matches the name of the POST request key coming into the application and a value which is a string that can be any of the validation rules defined here: Validation - Laravel - The PHP Framework For Web Artisans
Now the validation rules can be a little confusing right off of the bat, but hopefully the examples we do will help them make some more sense.
We need to set up our rules to be prepared to match the incoming data like this:
/**
 * Get the validation rules that apply to the request.
 *
 * @return array
 */
public function rules()
{
    return [
        'name'    => '',
        'address' => '',
        'city'    => '',
        'state'   => '',
        'zip'     => ''
    ];
}
Right now we just have a key that matches the incoming data and an empty string that we will fill in for the validations.
All of the fields should all have a validation of required. So in the array add required for each field:
/**
 * Get the validation rules that apply to the request.
 *
 * @return array
 */
public function rules()
{
    return [
        'name'    => 'required',
        'address' => 'required',
        'city'    => 'required',
        'state'   => 'required',
        'zip'     => 'required'
    ];
}
To separate each type of validation you can use a | character. This way you can have multiple types of validations for each field. The only field where we need more than one validation would be the zip field where it should be 5 numbers. We set up that validation with the regular expression similar to what we did on the javascript side: 'required|regex:/\b\d{5}\b/'
Our rules array should now look like:
/**
 * Get the validation rules that apply to the request.
 *
 * @return array
 */
public function rules()
{
    return [
        'name'    => 'required',
        'address' => 'required',
        'city'    => 'required',
        'state'   => 'required',
        'zip'     => 'required|regex:/\b\d{5}\b/'
    ];
}
Now we have server side validations similar to our Javascript validations! If any of these requests fail, we will get a (400 Bad Request) response back from the server and bad data will not be entered into our system! We can catch these errors as well and display them to the user.
There will be more scenarios as this app grows that we will be doing more complex validations. I'll be explaining those as well as we use them!
Step 5: Define Validation Error Messages
Now that we have our validations written, I like to define custom error messages for each of the invalid fields. To do that, add a messages() method after the rules() method. and add an empty array to be returned like this:
/**
 * Get the error messages for the defined validation rules.
 *
 * @return array
 */
public function messages()
{
    return [

    ];
}
Now for each validation on each variable, we can define a custom message that returns the proper response. The format used to define these messages is as follows: {key}.{validation} => {message}
So the key would be the variable name, the validation would be the type of validation like required and message would be the custom message we want to return.
Our messages array should look like this:
/**
 * Get the error messages for the defined validation rules.
 *
 * @return array
 */
public function messages()
{
    return [
      'name.required'     => 'A name for the cafe is required.',
      'address.required'  => 'An address is required to add this cafe.',
      'city.required'     => 'A city is required to add this cafe.',
      'state.required'    => 'A state is required to add this cafe.',
      'zip.required'      => 'A zip code is required to add this cafe.',
      'zip.regex'         => 'The zip code entered is invalid.'
    ];
}
Notice how the zip field has 2 messages for the different validations? This way if I enter something for the zip code but it isn't valid, we can return the exact message that we need to help guide the user to what they should enter.
Our validation request should look like:
<?php

namespace App\Http\Requests;

use Illuminate\Foundation\Http\FormRequest;

class StoreCafeRequest extends FormRequest
{
    /**
     * Determine if the user is authorized to make this request.
     *
     * @return bool
     */
    public function authorize()
    {
        return true;
    }

    /**
     * Get the validation rules that apply to the request.
     *
     * @return array
     */
    public function rules()
    {
        return [
            'name'    => 'required',
            'address' => 'required',
            'city'    => 'required',
            'state'   => 'required',
            'zip'     => 'required|regex:/\b\d{5}\b/'
        ];
    }

    /**
     * Get the error messages for the defined validation rules.
     *
     * @return array
     */
    public function messages()
    {
        return [
          'name.required'     => 'A name for the cafe is required.',
          'address.required'  => 'An address is required to add this cafe.',
          'city.required'     => 'A city is required to add this cafe.',
          'state.required'    => 'A state is required to add this cafe.',
          'zip.required'      => 'A zip code is required to add this cafe.',
          'zip.regex'         => 'The zip code entered is invalid.'
        ];
    }
}
One thing to remember, we can create a validator for any type of form whether it's a PUT, DELETE, or POST request.
There are ways to create custom validation rules as well if the defined set of rules doesn't match a use case you may have. We will be going through a tutorial on this later as well.
Step 6: Add Request To Controller Route
Since we have our validation created, we need to add the request to the controller route.
First, we need to open up App\Http\Controllers\API\CafesController.php and declare the the request we are using to the top of the controller like this:
/*
    Defines the requests used by the controller.
*/
use App\Http\Requests\StoreCafeRequest;
This is letting our controller know we are using the StoreCafeRequest.php that we just created.
Now we need to inject the request into our postNewCafe() method so we do that like this:
public function postNewCafe( StoreCafeRequest $request ){
    $cafe = new Cafe();

    $cafe->name     = Request::get('name');
    $cafe->address  = Request::get('address');
    $cafe->city     = Request::get('city');
    $cafe->state    = Request::get('state');
    $cafe->zip      = Request::get('zip');

    $cafe->save();

    return response()->json($cafe, 201);
  }
Now, before our method runs, the validator will validate that the data entered is correct. Finally, we update the assignment to not use the Request facade and use the $request object for storing a cafe request like this:
/*
|-------------------------------------------------------------------------------
| Adds a New Cafe
|-------------------------------------------------------------------------------
| URL:            /api/v1/cafes
| Method:         POST
| Description:    Adds a new cafe to the application
*/
public function postNewCafe( StoreCafeRequest $request ){
  $cafe = new Cafe();

  $cafe->name     = $request->get('name');
  $cafe->address  = $request->get('address');
  $cafe->city     = $request->get('city');
  $cafe->state    = $request->get('state');
  $cafe->zip      = $request->get('zip');

  $cafe->save();

  return response()->json($cafe, 201);
}
We now have our server side validation completed as well!
Conclusion
This is a very basic example of how to do both javascript validation in VueJS and Laravel validation in PHP. As the application grows, these validations will become more and more complex. However, it's good to have these in place so you don't end up with bad data in your application. You can see all of the code of course at GitHub - serversideup/roastandbrew
Like what you're reading?
We write code the same way -- production-grade, well-documented, and built to last. Two senior engineers available for a fraction of what a full-time hire costs.

Join our community
We're a community of 3,000+ members help each other level up our development skills.
 Join our Discord
 Platinum Sponsors

Active Discord Members
We help each other through the challenges and share our knowledge when we learn something cool.
Stars on GitHub
Our community is active and growing.
Newsletter Subscribers
We send periodic updates what we're learning and what new tools are available. No spam. No BS.
Sign up for our newsletter
Be the first to know about our latest releases and product updates.
We're a community empowering product builders with self-hosted tools and open source solutions.