
 Hire Us
Yes, zxcvbn is not a typo. It's actually a really awesome library from Dropbox that helps gauge the security of a password. Implementing the library with VueJS is a breeze and really helps guide your users when they need to create a secure password. This quick tutorial will guide you through the process of getting zxcvbn set up with VueJS. It's a perfect little helper especially when building an SPA to help ensure users choose a password that is difficult to crack.
If you are interested in learning more about the power of zxcvbn, check out their documentation on GitHub. There's also a blog post on Dropbox's blog explaining the library a little bit more.
Step 1: Install the zxcvbn Library
Assuming you have a VueJS install and a component or page set up where you need to have a user create a password, you just need to install the zxcvbn library. To do that, add the library to your JS package like so:
Install zxcvbn package
npm install zxcvbn
That's it! Now you have access to the library and can start verifying secure passwords.
Step 2: Include zxcvbn and Build Computed Property
Whatever component you are having the user register for your application with, you need to do two things. First, include the library within the component. Second, build a computed property that reacts to the user's password entry to compute the security of the password.
Let's assume you have a really basic registration component with 0 styles and 0 classes. Should look something like this:
Basic Vue registration component template
<template>
    <div>
        <div>
            <label>Name</label>
            <input type="text" v-model="form.name"/>
        </div>

        <div>
            <label>Email</label>
            <input type="text" v-model="form.email"/>
        </div>

        <div>
            <label>Password</label>
            <input type="password" v-model="form.password"/>
        </div>

        <div>
            <label>Confirm Password</label>
            <input type="password" v-model="form.confirm_password"/>
        </div>

        <a v-on:click="register()">Register</a>
    </div>
</template>

<script>
    export default {
        data(){
            return {
                form: {
                    name: '',
                    email: '',
                    password: '',
                    confirm_password: ''
                }
            }
        },

        methods: {
            register(){
                // Implement your registration code.
            }
        }
    }
</script>
Now I'm not going to dive into any of the other validations or fields you may need. All we really need to do is focus on one piece of data. That's the form.password.
The first step to making this form come to life is including the zxcvbn library in your component. So add the following line of code before you define your module:
Include zxcvbn library in component
<script>
    // Include the library to validate password security
    const zxcvbn = require('zxcvbn');

    export default {
        data(){
            return {
                form: {
                    name: '',
                    email: '',
                    password: '',
                    confirm_password: ''
                }
            }
        },
      ...
    }
</script>
Now we have the library present in our component, let's add that computed property that is simply the result of the function.
The second step we need to do is add a computed field to your component. As the user types their password, the security computes and we can use that to display a visual on how strong the password is. Add the following computed property to your component:
Add password strength computed property
computed: {
    passwordStrength(){
        return zxcvbn( this.form.password );
    }
},
With VueJS, any local data property referenced within a computed property, fires an update upon change. This is the beauty of VueJS' reactivity system. In this case, the local data property is this.form.password. We then compute the security of that value using the zxcvbn() method and return the result. That's pretty much it! Now we just need to display it!
Step 3: Providing a Visual Display
This is what we've been waiting for! It's now time to make a simple feedback display for the user so they know how strong their password is. When you compute the passwordStrength variable, you get an object with a TON of data. There is only 1 key that we are going to be using for this implementation and that's the score key.
The score key returns a value from 0 - 4 with 0 being a very insecure password and 4 being a very hard to crack password. Before we get too far ahead, I'd recommend checking out all of the values returned because there are a few that could be cool to customize your visualizations with. They even give a feedback value which is a verbal communication on what they can improve with.
For our uses, we are going to display a color meter showing how secure their password is. Since this is a display aspect and there are a million different front end ways of doing this, I'm just going to leave this un-styled. I'll just add the pseudo-code nnecessary so you can implement it however you want.
In your template, below the password input, add the following code:
Password strength visual indicator template
<div>
    <label>Password</label>
    <input type="password" v-model="form.password"/>

    <div>
        <span v-bind:class="{
                    'red' : passwordStrength.score <= 1,
                    'orange' : passwordStrength.score == 2,
                    'yellow' : passwordStrength.score == 3,
                    'green' : passwordStrength.score == 4
                }"></span>
        <span v-bind:class="{
                    'grey' : passwordStrength.score <= 1,
                    'orange' : passwordStrength.score == 2,
                    'yellow' : passwordStrength.score == 3,
                    'green' : passwordStrength.score == 4
                }"></span>
        <span v-bind:class="{
                    'grey' : passwordStrength.score <= 2,
                    'yellow' : passwordStrength.score == 3,
                    'green' : passwordStrength.score == 4
                }"></span>
        <span v-bind:class="{
                    'grey' : passwordStrength.score <= 3,
                    'green' : passwordStrength.score == 4
                }"></span>
    </div>
</div>
Let's break that down a little bit. We added a <div> element with four <span> tags. Each tag represents a level of security. Assuming you have colored classes that can be applied to elements for background color, this will display something like this:
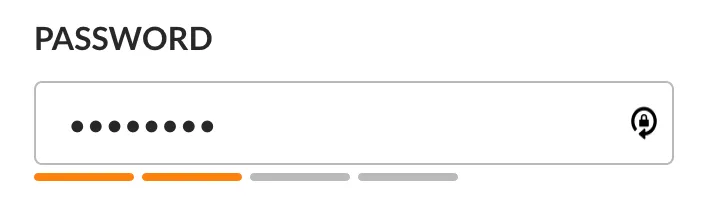
The only thing to note is that as you move from 1 to 4 the required colors get less. Look at the last <span> tag. It can either be grey or green depending on the score. The first <span> can be all of the colors as the security increases. Feel free to style this however you want and even incorporate some of the other feedback tools from the library. The final step is to ensure the user entered a secure password before submitting the form.
Step 4: Validating Password Security Before Submitting
So now that we have our visual display set up, let's ensure the user actually entered a secure password before submitting the form. However you do validation, all you have to do is add the following check:
Password strength validation check
if( this.passwordStrength.score < 4 ){
    // Weak password, re-do
}else{
    // Password is strong!
}
That's it! Pretty straight forward and you have a powerful tool to encourage your new users to enter strong passwords!
If you are interested in more tips and tricks that you can implement into your API or Single Page Application, we are writing a book that will be filled with in depth coverage of designing your API + SPA from the ground up. It will include more tips and tricks and other implementations you can add to your app. If you are interested, make sure you sign up to be notified of it's release!
Let me know if you have any questions or comments in the comments section below, or catch me on twitter (@danpastori).
Want to work together?
Professional developers choose Server Side Up to ship quality applications without surrendering control. Explore our tools and resources or work directly with us.

Join our community
We're a community of 3,000+ members help each other level up our development skills.
 Join our Discord
 Platinum Sponsors

Active Discord Members
We help each other through the challenges and share our knowledge when we learn something cool.
Stars on GitHub
Our community is active and growing.
Newsletter Subscribers
We send periodic updates what we're learning and what new tools are available. No spam. No BS.
Sign up for our newsletter
Be the first to know about our latest releases and product updates.
We're a community empowering product builders with self-hosted tools and open source solutions.