
 Hire Us
Displaying Resources on a Google Map With Vue JS
Dan Pastori
November 6th, 2017
So now that we have our cafes being geocoded Geocode An Address With Google Maps, we can display the cafe on a Google Map! This is extremely helpful for providing location based data. With locations you can narrow results based off of distance, show people where objects are located, calculate drive times, and a whole bunch more.
Like with the GeoCoding API, there are rate limits: Pricing and Plans | Google Maps APIs Pricing and Plans | Google Developers Since roastandbrew.coffee isn't loading too many requests each day we should be fine. However, make sure you enable the proper API or pay for the one that fits your app's requirements.
For this tutorial, our /cafes route will contain our map. We will plan for future expansions of the functionality, so what we will do right now is just display the cafes on the map after we add them.
Step 1: Get a Javascript Google Maps API Key
We will need to get a Javascript API key here: https://developers.google.com/maps/documentation/javascript/get-api-key This is different then the server side API Key we got when we set up the geocoding.
Once you click on the Get A Key as seen below, you can select your project or create a new project and the key will appear. 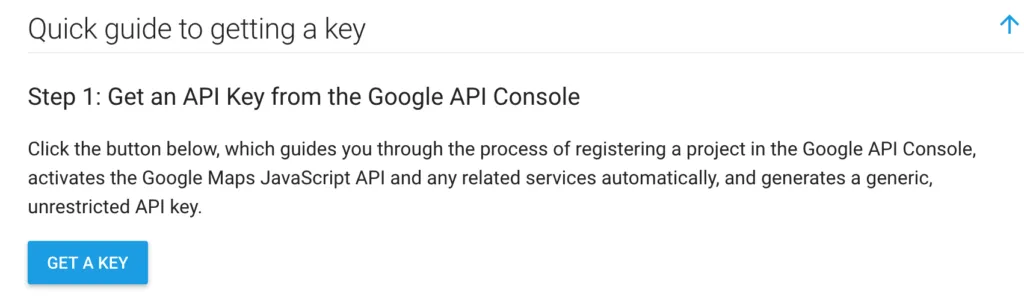
Step 2: Add the JS API Key to your config.js file
Similar to the environment variables we had set up in Laravel with the Geocoding API, we should store this key in a re-useable spot. This is a public key, you can store it in your JS file.
Your /resources/assets/js/config.js file should look like:
/*
    Defines the API route we are using.
*/
var api_url = '';
var google_maps_js_api = '{YOUR_KEY_HERE}';

switch( process.env.NODE_ENV ){
  case 'development':
    api_url = 'https://roast.dev/api/v1';
  break;
  case 'production':
    api_url = 'https://roastandbrew.coffee/api/v1';
  break;
}

export const ROAST_CONFIG = {
  API_URL: api_url,
  GOOGLE_MAPS_JS_API: google_maps_js_api
}
Step 3: Set Up Security on Your Key
Make sure you set up the proper security as well so your quota doesn't get hijacked. To do that, visit your Google developers console: Google Cloud Platform and select your project. On your dashboard you will see all of the APIs you have enabled for your project.
Click the credentials tab on the left of your screen: 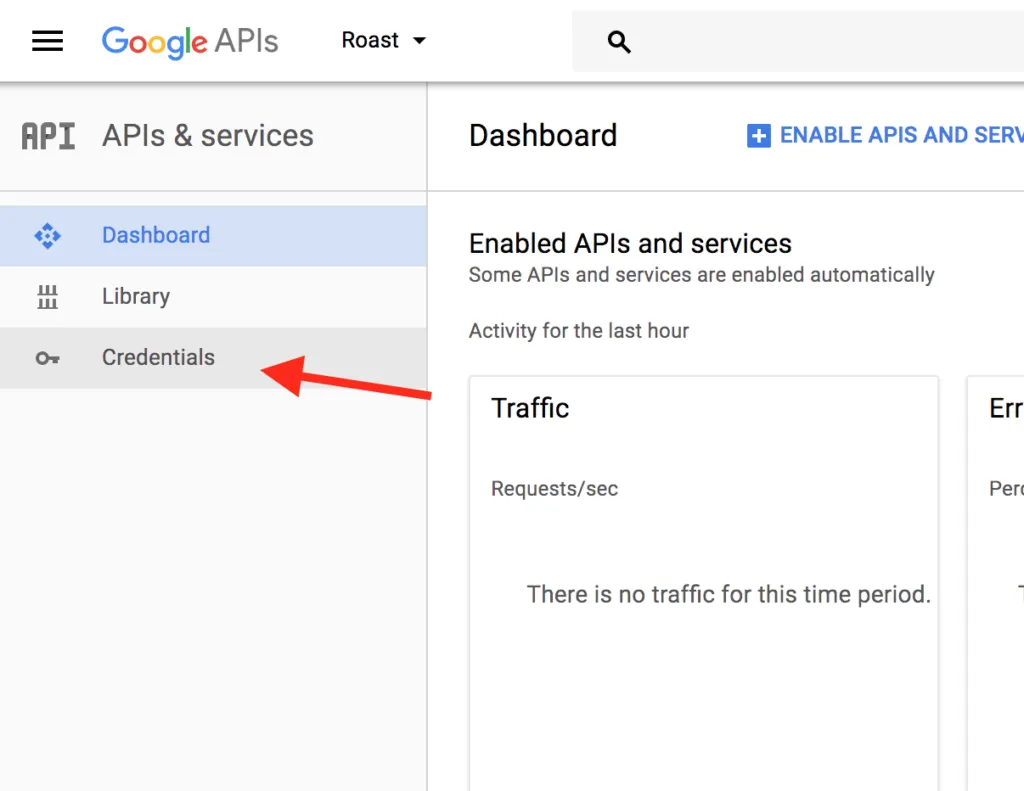
You should see 2 API Keys, and a Web oAuth Client if you have been following the tutorial series. If not, you should see the API Key you just created. Click the little edit link on the right of the listing:

You will be brought to a page where you can edit all of the information for your API Key. I give it a name so it's easier to recognize, but for security you should restrict by HTTP referrers (web sites) and in the drop down box, enter your domains you wish to use the keys on. In this case I use the key on roastandbrew.coffee and roast.dev for my development.
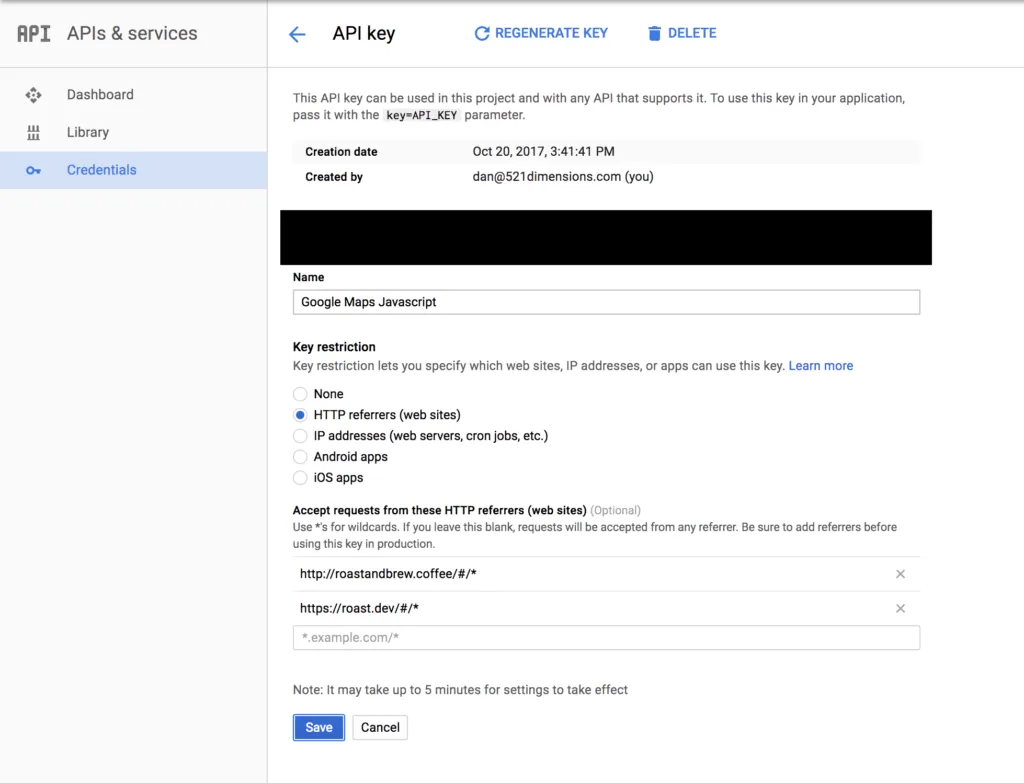
Notice the * after the URLs? This allows the map to be present on any page. You can restrict by certain pages if needed as well.
Now your API Key will only validate when it's coming from your domain. Click 'Save' and you should be good to go!
Step 4: Add Google Maps Script to app.blade.php
To ensure the Google Maps script is added to your application, open up your resources/views/app.blade.php file and add the following line of code in the head tags:
<script async defer src="https://maps.googleapis.com/maps/api/js?key={YOUR_GOOGLE_MAPS_API_KEY}"></script>
Fill in your appropriate API Key as well for the call! This is loading the script asynchronously. If you are doing this outside of VueJS you can add a callback that gets called when the script has loaded successfully. We will be loading the map inside of a component when the page is ready so we will be doing this a little differently.
Step 5: Add CafeMap Component
We will be storing our map as a component that we can insert into our Cafes page. This will separate the functionality concerns and make it easy to update with the data that we need.
First we will add the following folder: /resources/assets/js/components/cafes/. In that directory add a file called CafeMap.vue. This will be our map component.
In the CafeMap.vue file add the stubbed Vue Component structure like this:
<style lang="scss">

</style>

<template>
  <div id="cafe-map">

  </div>
</template>

<script>
  export default {

  }
</script>
Step 6: Add the Google Map
Now here's the thing with Google Map, it's a variable, but we do NOT want Vue to apply it's reactive watching to all of the methods, it doesn't need it. So we will do a trick to define it locally outside of our data object. The other trick is, we need the HTML to be rendered by the component before we can build a map. Every Google Map needs a predefined width and height. This means we need to look at the lifecycle hooks provided by VueJS. The one that works perfectly is the mounted() hook.
First we will need to add the mounted() hook to our component like this:
<style lang="scss">

</style>

<template>
  <div id="cafe-map">

  </div>
</template>

<script>
  export default {
    mounted(){

        }
  }
</script>
Next, we will need to add a default width and height to the map so in our scss, add:
div#cafe-map{
  width: 100%;
  height: 400px;
}
Now the last thing we need to do is add a few properties for the default latitude and longitude required for the map. I added these as properties so we can change them if needed when we initialize the map. Our CafeMap component should look like:
<style lang="scss">
  div#cafe-map{
    width: 100%;
    height: 400px;
  }
</style>

<template>
  <div id="cafe-map">

  </div>
</template>

<script>
  export default {
    props: {
      'latitude': {
        type: Number,
        default: function(){
          return 39.50
        }
      },
      'longitude': {
        type: Number,
        default: function(){
          return -98.35
        }
      },
      'zoom': {
        type: Number,
        default: function(){
          return 4
        }
      }
    },

    data(){
      return {

      }
    },

    mounted(){

    }
  }
</script>
As you can see I provided some defaults and types to the properties. VueJS allows the user to define what type each property should be so when making a re-usable component, the developer doesn't get bad data passed to the component. For a full list of validation types check out the Vue docs here: Components — Vue.js.
I also added a zoom level to the properties so the developer can add the zoom they wish the map was zoomed into.
Now, we have enough data we can finally initialize our map. As we mentioned before, we don't want the map to to be reactive so we will not define it in our data() method, but we do want it to be scoped and referenced inside of our component. So in our mounted() lifecycle hook add the following:
mounted(){
      /*
        We don't want the map to be reactive, so we initialize it locally,
        but don't store it in our data array.
      */
      this.map = new google.maps.Map(document.getElementById('cafe-map'), {
        center: {lat: this.latitude, lng: this.longitude},
        zoom: this.zoom
      });
    }
When we use this.map we are assigning the map to a local variable that we can use inside our component's scope. We also initialize the map to be the latitude and longitude of the properties that get passed in, along with the default zoom level.
Now, we have our map ready to rock and roll, just a few more steps and we can display our cafes!
Step 7: Add the CafeMap.vue component to the Cafes Page
We want to display the map on the cafes page. First, we will open up the /resrouces/assets/js/pages/Cafes.vue page.
Now before we export our default module, we need to import our CafeMap component.
Add the import above the export default:
import CafeMap from '../components/cafes/CafeMap.vue';
Now we need to tell our Cafes page we will use the CafeMap component by defining it within the components like this:
export default {
  components: {
    CafeMap
  }
}
Last but not least, we need to add the component to the page so our updated Cafes page should look like:
<style>

</style>

<template>
  <div id="cafes">
    <div class="grid-x">
      <div class="large-9 medium-9 small-12 cell">
        <cafe-map></cafe-map>
      </div>
      <div class="large-3 medium-3 small-12 cell">

      </div>
    </div>
  </div>
</template>

<script>
  import CafeMap from '../components/cafes/CafeMap.vue';

  export default {
    components: {
      CafeMap
    }
  }
</script>
If you visit the page you should see a nice Google Map waiting for you like this:

Step 8: Adding the Cafes to the Map
This is the final step in the tutorial. We need our cafes we have loaded added to the map. To do this we will be adding the cafes as markers. Right now the markers will just be placeholders, in the next tutorials we will customize the markers, customize the infowindows, filter markers, etc.
First we will need to add a markers array to our data in the CafeMap.vue component like this:
data(){
  return {
    markers: []
  }
},
Now we need to import all of the cafes we loaded. This is stored in our Vuex module (Build a Vuex Module - Server Side Up) that gets loaded in our layout from our layout (/building-page-layout-vue-router/).
To add our Vuex to the Cafes page, we need to load the data from Vuex as a computed property:
computed: {
  /*
    Gets the cafes
  */
  cafes(){
    return this.$store.getters.getCafes;
  }
},
We can now reference the cafes from within our Cafes page. Next we need to add a few methods.
The first method is the buildMarkers() method. What this will do is create a Google Maps Marker Markers | Google Maps JavaScript API | Google Developers for each of our Cafes. So add a methods object and a buildMarkers() method:
methods: {
  buildMarkers(){

  }
}
In this method, we will iterate over all of our cafes we loaded, create a Google Maps Marker and set it to the map that we defined. Then we will add the marker to the markers array in the data. Our method should look like this:
/*
  Builds all of the markers for the cafes
*/
buildMarkers(){
  /*
    Initialize the markers to an empty array.
  */
  this.markers = [];

  /*
    Iterate over all of the cafes
  */
  for( var i = 0; i < this.cafes.length; i++ ){

    /*
      Create the marker for each of the cafes and set the
      latitude and longitude to the latitude and longitude
      of the cafe. Also set the map to be the local map.
    */
    var marker = new google.maps.Marker({
      position: { lat: parseFloat( this.cafes[i].latitude ), lng: parseFloat( this.cafes[i].longitude ) },
      map: this.map
    });

    /*
      Push the new marker on to the array.
    */
    this.markers.push( marker );
  }
}
What this does is initialize the markers to an empty array. This is so if a cafe gets added, we can add it to a fresh array. Next, we iterate over all of the cafes in the Vuex module. With each cafe, we create a Google Maps Marker and set the latitude and longitude to the Cafe's latitude and longitude. We also set the map to our Google Map. We then push the marker to the markers array.
Now that we have the markers being built, we should write a clearMarkers() method. This will clear the markers from the map. This is useful when we re-render the page, load a new cafe, etc. This method is very simple, it just sets each marker in our our array's map to null using the setMap() method available on each marker. The clear markers method should look like:
/*
  Clears the markers from the map.
*/
clearMarkers(){
  /*
    Iterate over all of the markers and set the map
    to null so they disappear.
  */
  for( var i = 0; i < this.markers.length; i++ ){
    this.markers[i].setMap( null );
  }
},
Now we have to tie the two together. At the end of the mounted() method, we should clear and re-build the markers. What this will do is clean up any old markers first before we reset the markers array, and build it with the cafes. Add the following lines to the end of the mounted() method:
/*
  Clear and re-build the markers
*/
this.clearMarkers();
this.buildMarkers();
Finally, we need to add a watcher to our cafes. When the cafes get updated, we need to clear the markers and rebuild them as well. For more information on Watchers, check out: Computed Properties and Watchers — Vue.js. To do this add a watcher to the CafeMap.vue component like this:
watch: {
    cafes(){

    }
},
This will watch the cafes computed property and when it changes, fire a method. In this case, we want to clear and re-build the markers, so we add the same two lines of code:
watch: {
  /*
    Watches the cafes. When they are updated, clear the markers
    and re build them.
  */
  cafes(){
    this.clearMarkers();
    this.buildMarkers();
  }
},
Now we have the component set up so when the cafes change, we re-build the markers and when the component is mounted we re-build the markers. This way if a cafe gets added, it's right on our map and if we navigate away from the cafes page and navigate back we will still have our markers. If you visit the /cafes/ route you should see the markers for the cafes added:

Our CafeMap.vue component should look like:
<style lang="scss">
  div#cafe-map{
    width: 100%;
    height: 400px;
  }
</style>

<template>
  <div id="cafe-map">

  </div>
</template>

<script>
  export default {
    props: {
      'latitude': {
        type: Number,
        default: function(){
          return 39.50
        }
      },
      'longitude': {
        type: Number,
        default: function(){
          return -98.35
        }
      },
      'zoom': {
        type: Number,
        default: function(){
          return 4
        }
      }
    },

    data(){
      return {
        markers: []
      }
    },

    computed: {
      /*
        Gets the cafes
      */
      cafes(){
        return this.$store.getters.getCafes;
      }
    },

    watch: {
      /*
        Watches the cafes. When they are updated, clear the markers
        and re build them.
      */
      cafes(){
        this.clearMarkers();
        this.buildMarkers();
      }
    },

    mounted(){
      /*
        We don't want the map to be reactive, so we initialize it locally,
        but don't store it in our data array.
      */
      this.map = new google.maps.Map(document.getElementById('cafe-map'), {
        center: {lat: this.latitude, lng: this.longitude},
        zoom: this.zoom
      });

      /*
        Clear and re-build the markers
      */
      this.clearMarkers();
      this.buildMarkers();
    },

    methods: {
      /*
        Clears the markers from the map.
      */
      clearMarkers(){
        /*
          Iterate over all of the markers and set the map
          to null so they disappear.
        */
        for( var i = 0; i < this.markers.length; i++ ){
          this.markers[i].setMap( null );
        }
      },

      /*
        Builds all of the markers for the cafes
      */
      buildMarkers(){
        /*
          Initialize the markers to an empty array.
        */
        this.markers = [];

        /*
          Iterate over all of the cafes
        */
        for( var i = 0; i < this.cafes.length; i++ ){

          /*
            Create the marker for each of the cafes and set the
            latitude and longitude to the latitude and longitude
            of the cafe. Also set the map to be the local map.
          */
          var marker = new google.maps.Marker({
            position: { lat: parseFloat( this.cafes[i].latitude ), lng: parseFloat( this.cafes[i].longitude ) },
            map: this.map
          });

          /*
            Push the new marker on to the array.
          */
          this.markers.push( marker );
        }
      }
    }
  }
</script>
Conclusion
Google Maps is extremely powerful and has great documentation. In future tutorials, we will be customizing the look and feel of the map. For now, feel free to check out all of the source code here: GitHub - serversideup/roastandbrew
Like what you're reading?
We write code the same way -- production-grade, well-documented, and built to last. Two senior engineers available for a fraction of what a full-time hire costs.

Join our community
We're a community of 3,000+ members help each other level up our development skills.
 Join our Discord
 Platinum Sponsors

Active Discord Members
We help each other through the challenges and share our knowledge when we learn something cool.
Stars on GitHub
Our community is active and growing.
Newsletter Subscribers
We send periodic updates what we're learning and what new tools are available. No spam. No BS.
Sign up for our newsletter
Be the first to know about our latest releases and product updates.
We're a community empowering product builders with self-hosted tools and open source solutions.