
 Hire Us
Installing And Configuring Laravel Socialite
Dan Pastori
September 5th, 2017
If you are following along with the tutorial started here installing-configuring-laravel-spa, we will now begin to install the Laravel packages that allow for authentication with an oAuth provider. Then we will set up our own oAuth provider. Yea it's a lot of oAuth. However this allows the user to log in with an app they are familiar with like Facebook, Twitter, Google, etc and then consume our own API after being authenticated. You can find a list of oAuth socialite providers here for more obscure logins:
First we are going to just configure Laravel Socialite to accept providers. Next we will set up Facebook, Twitter, and Google +.The hardest part about setting up these oAuth logins isn't the Socialite configuration, but the actual making of the API keys for each platform.
Install Laravel Socialite
Since there is such good documentation here: GitHub - laravel/socialite, I'm not going to run through all of the process in detail. Essentially I ran the following commands and added a few lines of code:
- Navigate to the directory you are developing your app in.
composer require laravel/socialite- Added
Laravel\Socialite\SocialiteServiceProvider::class,to the config/app.php file in the providers array. - Added
'Socialite' => Laravel\Socialite\Facades\Socialite::class,to the aliases array in the config/app.php file.
We will do the next step from the socialite instructions with the providers as we get the information we need.
Configuring Facebook Authentication
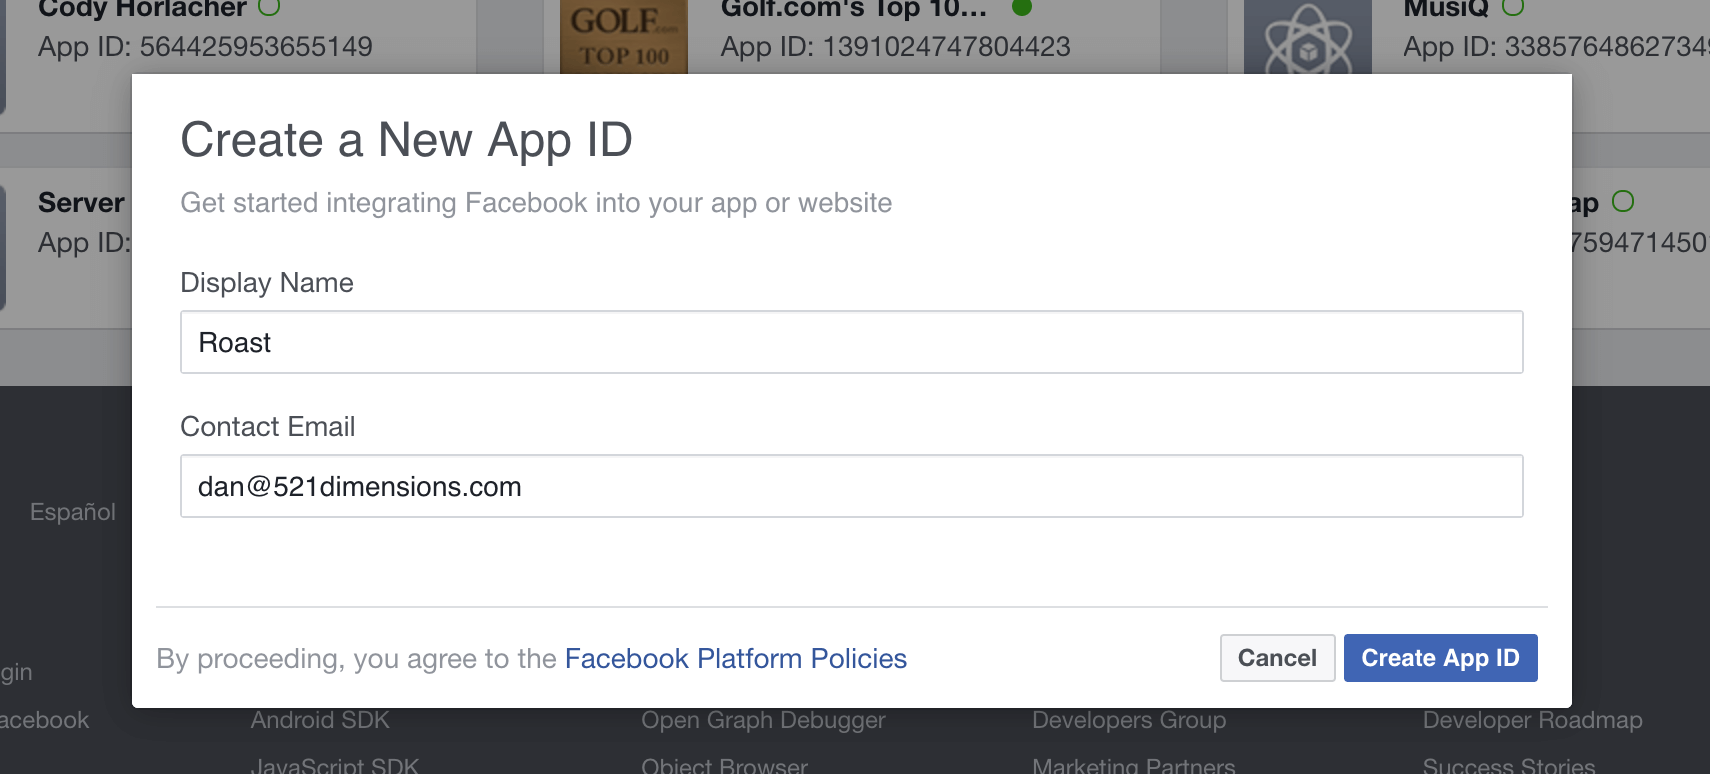
- First go to developers.facebook.com and sign in. Once Signed in, click on your profile in the top right and make a new app. Then click 'Create App ID'.

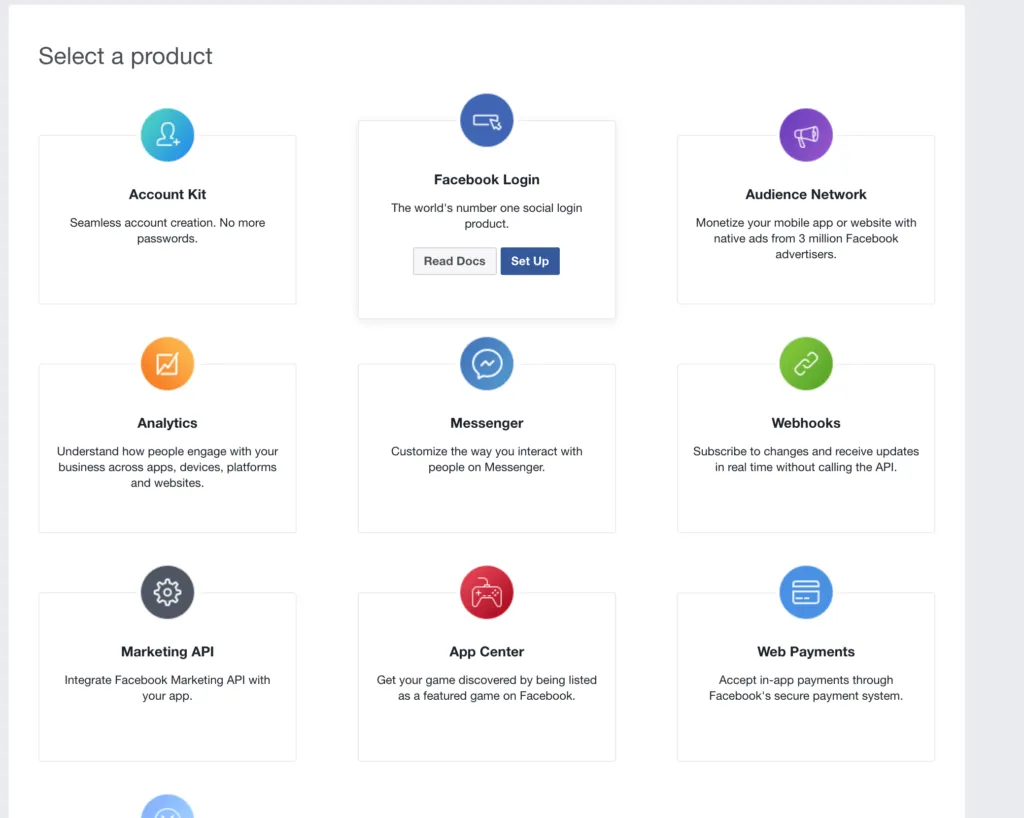
- Next select the Facebook Login and 'Set Up' from the list of products.
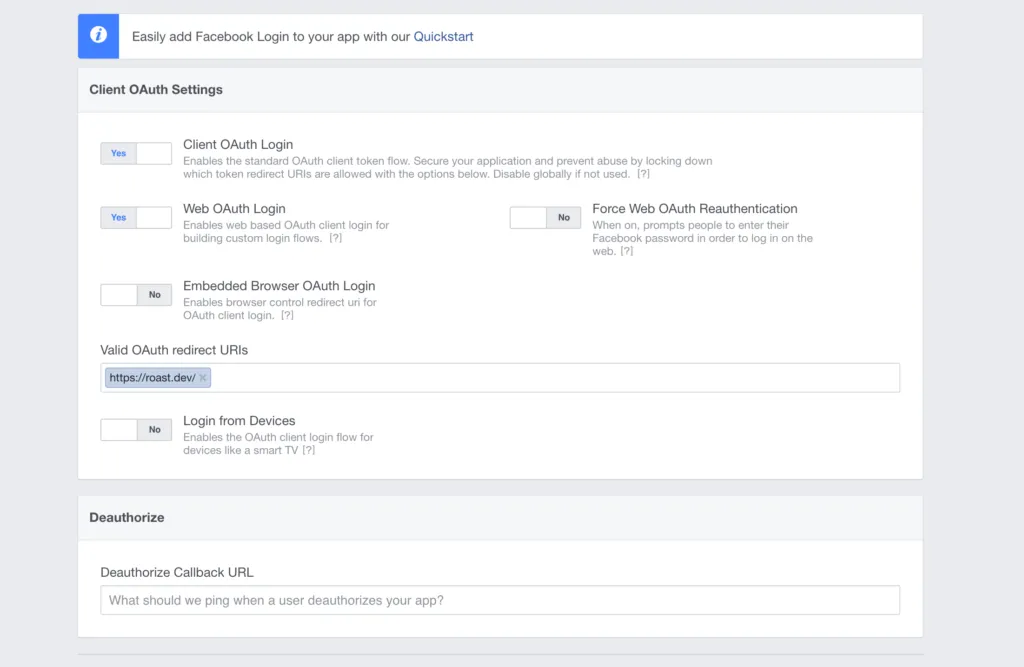
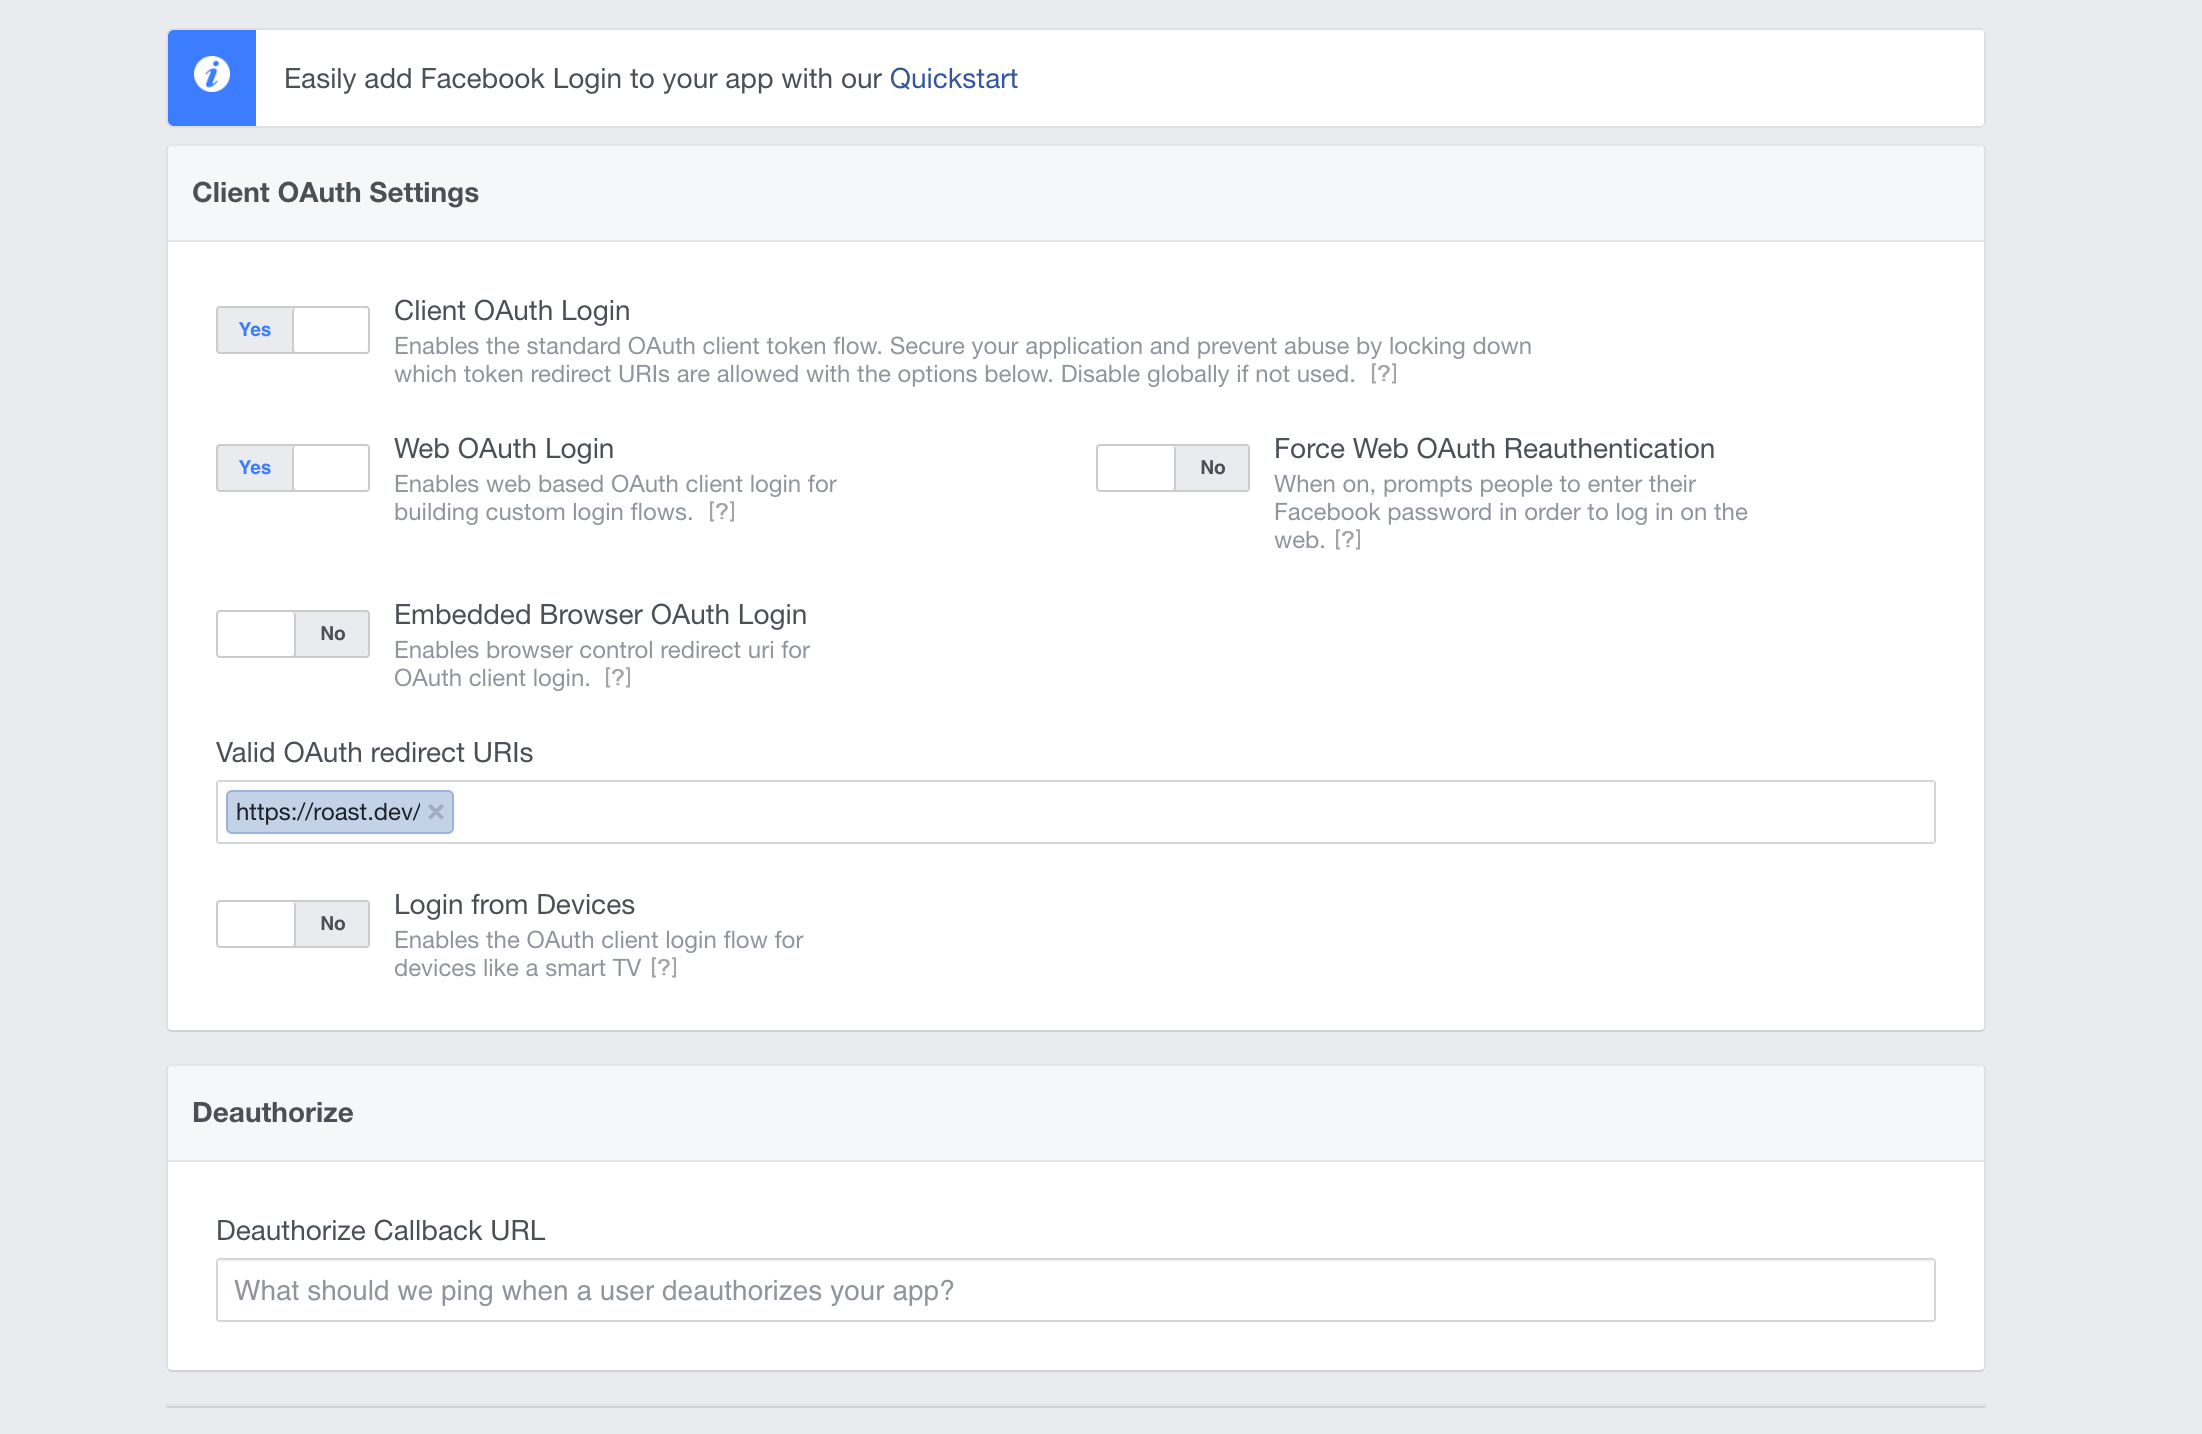
- Select www for oAuth and then continue. I didn't go through the Quickstart screen because the settings screen is all we needed to add a callback URL. Essentially you will add more as time goes if you have staging or production environments. For now I just added roast.dev and roastandbrew.coffee for production.
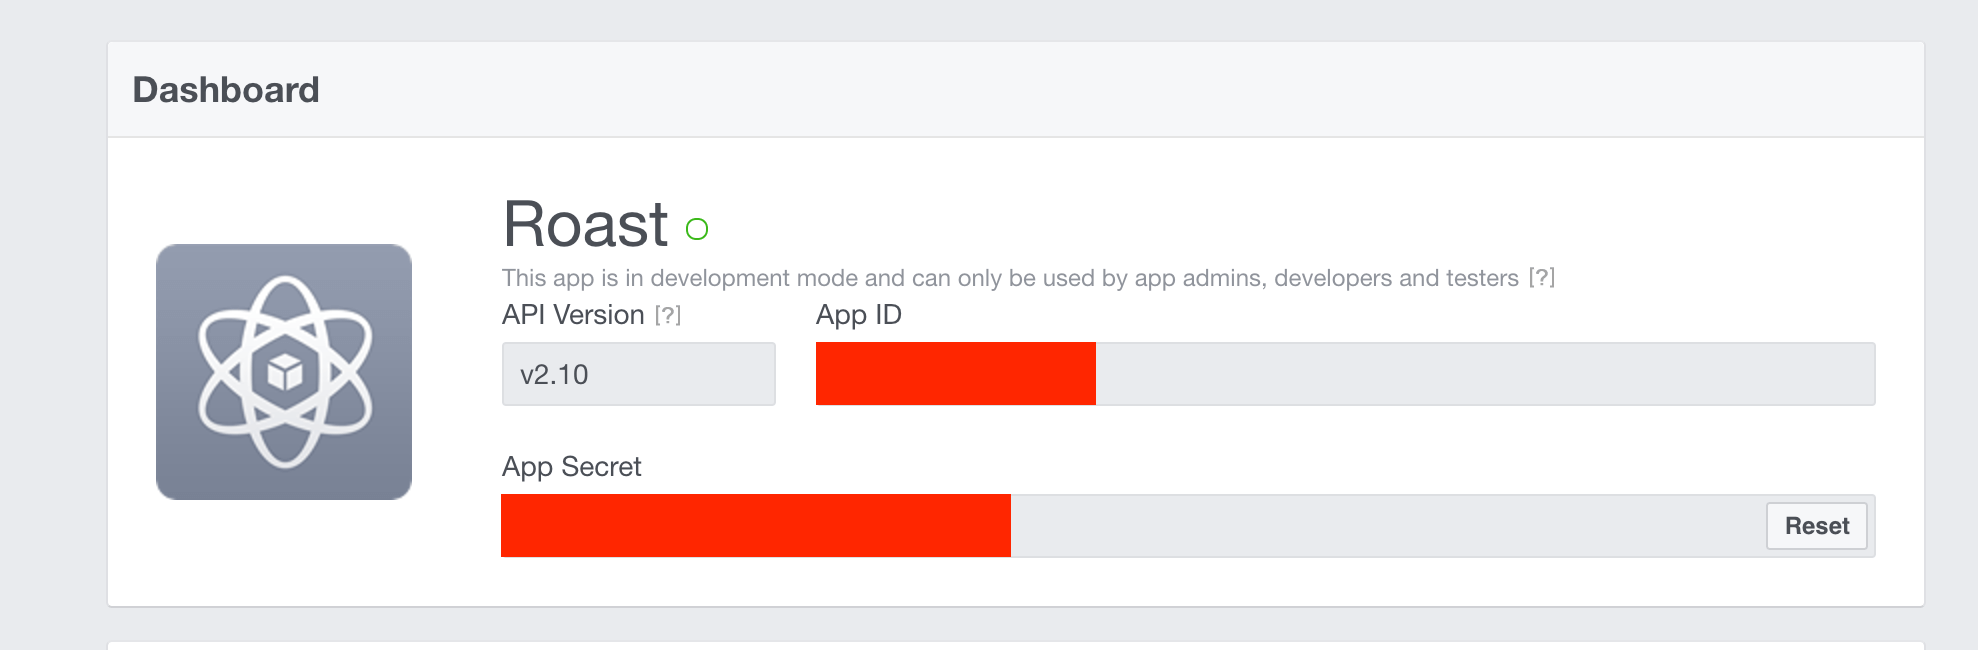
- Next, navigate to the App Dashboard and find your App ID and App Secret. You might need to re-authenticate with Facebook profile to view app secret. That's alright, you will need these two to add to your Laravel config.
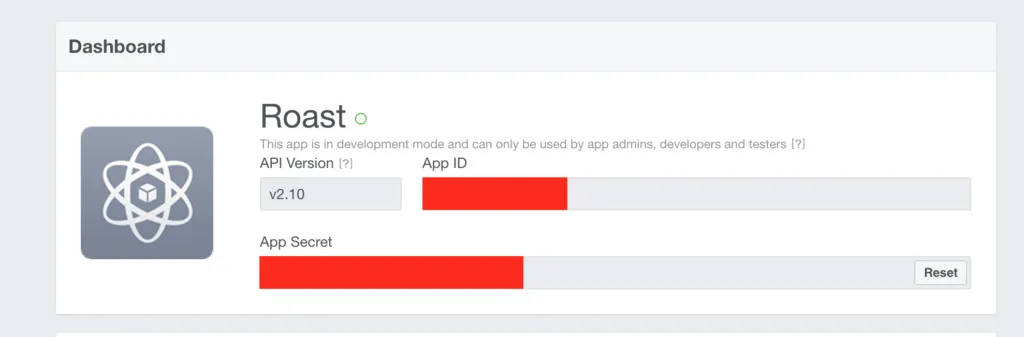
- Once you have your App ID and App Secret add the following keys to your .env file. I store all secrets in this file since it's not stored in the repo and the callback URLs change per staging and production installs.
- Next, navigate to the App Dashboard and find your App ID and App Secret. You might need to re-authenticate with Facebook profile to view app secret. That's alright, you will need these two to add to your Laravel config.

FACEBOOK_APP_ID={APP_ID_HERE}
FACEBOOK_APP_SECRET={APP_SECRET_HERE}
FACEBOOK_REDIRECT=https://roast.dev/login/facebook/callback
- After you have the environment set up, add the following key to your array in the
config/services.phpfile:
'facebook' => [
  'client_id' => env('FACEBOOK_APP_ID'),
  'client_secret' => env('FACEBOOK_APP_SECRET'),
  'redirect' => env('FACEBOOK_REDIRECT'),
]
You are now good to go with Facebook for configuration. We will add the routes for the login and callback information after we get the information we need for Google+ and Twitter.
Configuring Twitter Authentication
- First log into Twitter and visit Twitter Application Management. You can create your app here.
- Once you click on create app, you will have a simple form to fill out. Fill out the form like I did (except with your app information lol) and click submit. I just added the .dev URL for now, you can change it later.

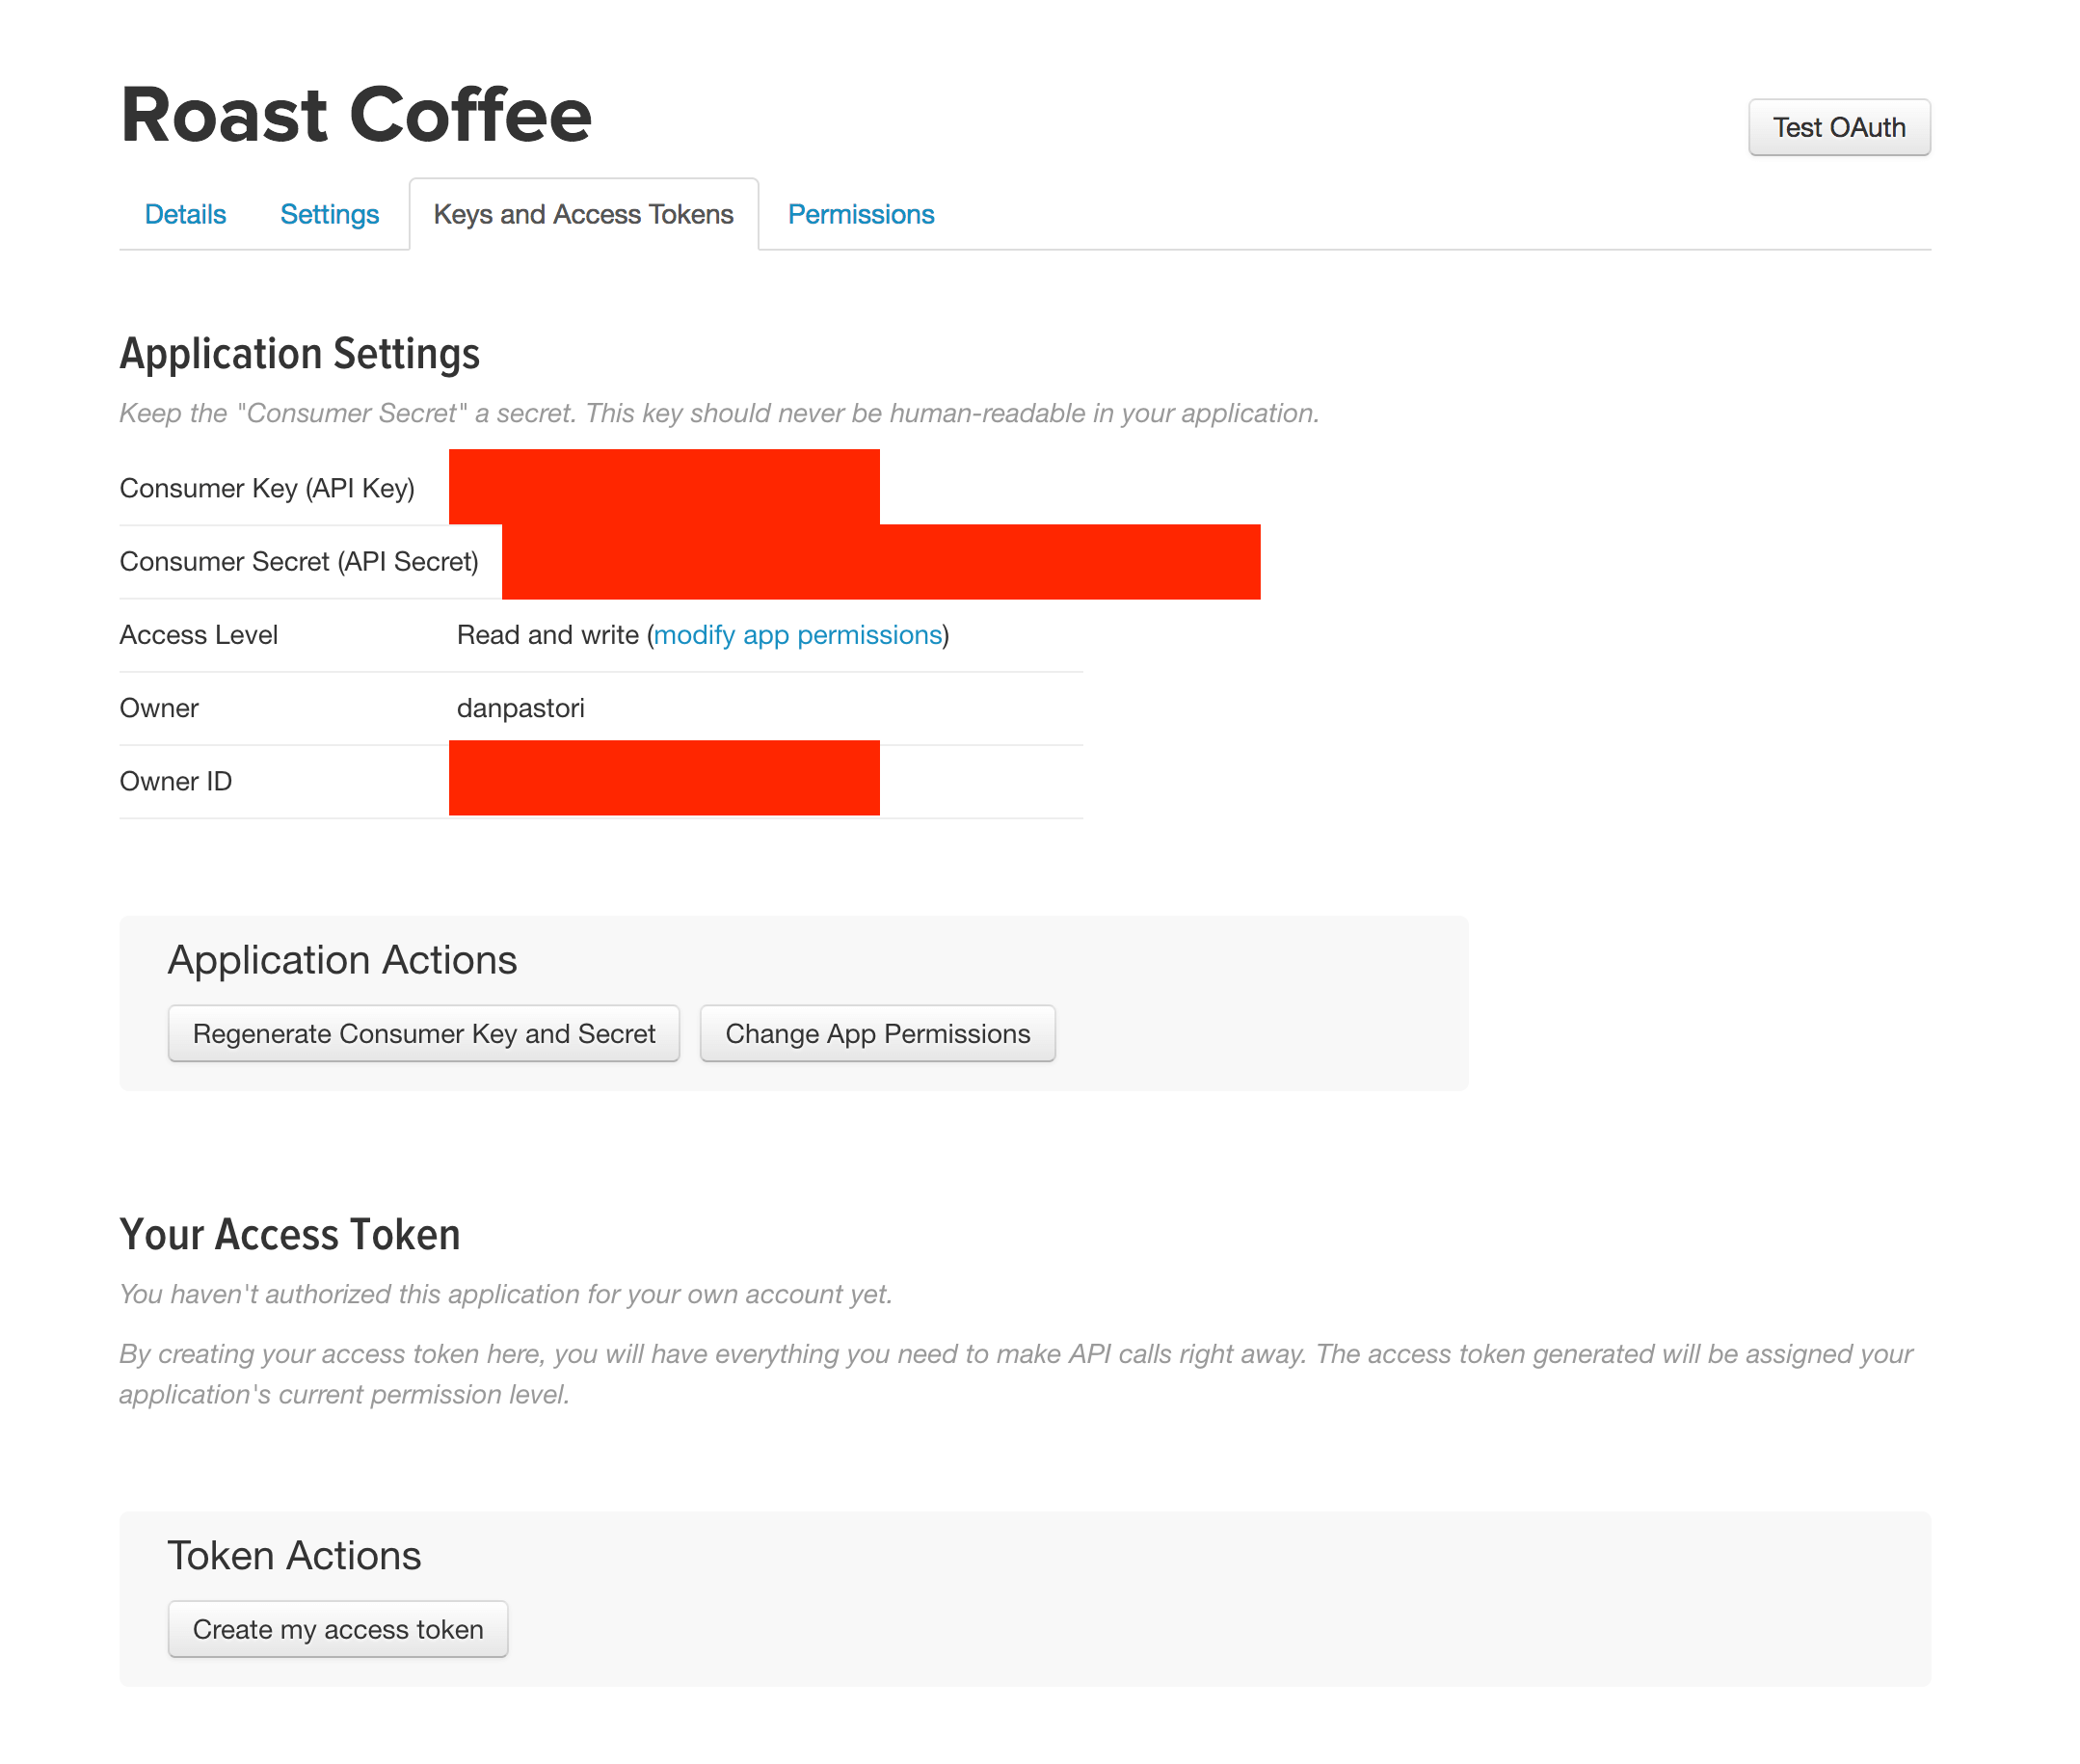
- Once you get your app created, head over to the 'Keys and Access Tokens' tab to get your keys we need for the app.

- Copy these keys and add them to your .env file

TWITTER_APP_ID={TWITTER_APP_ID_HERE}
TWITTER_APP_SECRET={TWITTER_APP_SECRET_HERE}
TWITTER_REDIRECT=https://roast.dev/login/twitter/callback
- Add the following key to your config/services.php file. Twitter is now activated for oAuth. We will add these log in URLs after Google +.
'twitter' => [
  'client_id' => env('TWITTER_APP_ID'),
  'client_secret' => env('TWITTER_APP_SECRET'),
  'redirect' => env('TWITTER_REDIRECT')
]
Configure Google Login
Out of all of the oAuth providers, Google Login is one of the weirdest to set up because of their developer console and what you have to configure. Luckily I'll outline below so it should be pretty easy to follow along. Took me awhile and a lot of Stack Overflow searching to find out how to actually add the service for logging in.
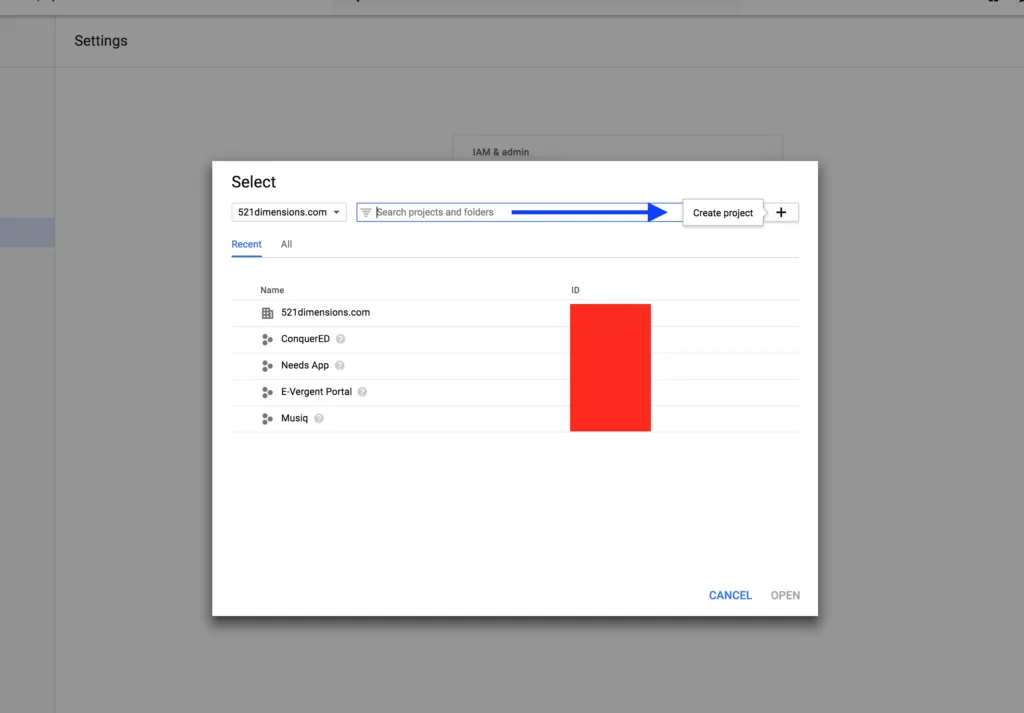
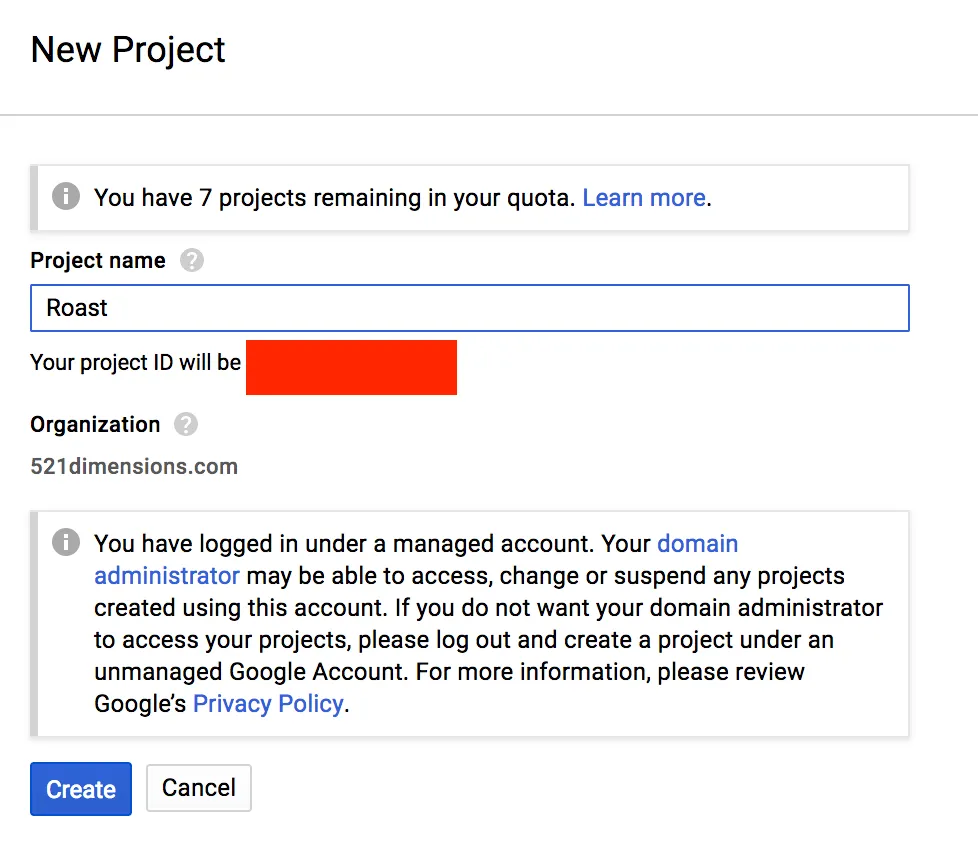
- Once you log into Google Cloud Platform click "Select Project" in the top left then the '+' sign in the modal to create a new project.
- On the next page, you will be prompted to create a new project. Simply fill in the form. In this case we just entered 'Roast' and then Google will create your project. You won't be brought to a new page, but in the top right of the screen a notification will appear when your project is done.
- When your project is created and you navigate to the project dashboard, there will be a huge myriad of cards. You will see a few links to Enable APIs for your project. Either way you will end up to a screen that looks like:
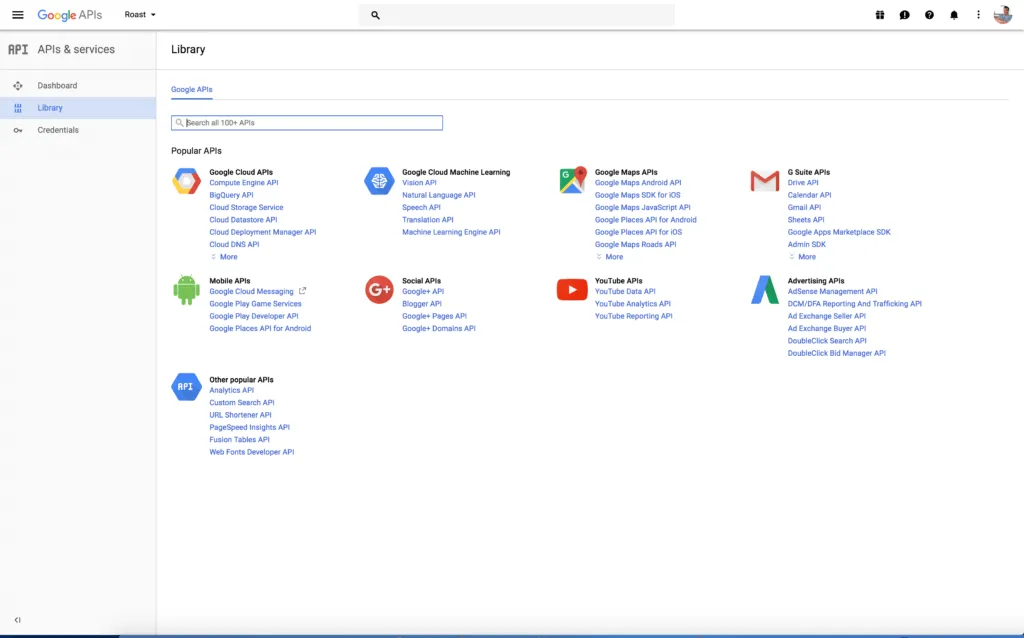 which allows you to enable any sort of API you wish.
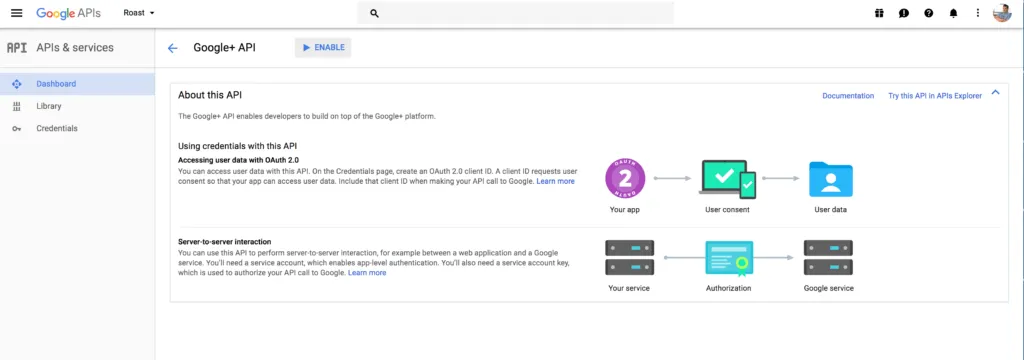
 - We will be wanting to implement the Google+ API which allows the user to log into your app with their Google account. You will have to click enable on the top of the screen to enable the API.
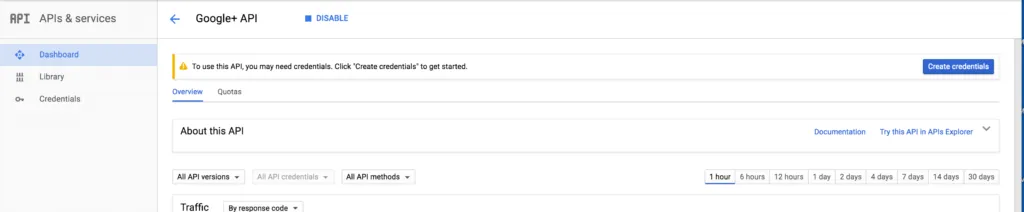
- Once the API is enabled, you can see the statistics for your app's API usage. First we need to create the credentials so the user can log into our app using Google.
- To create your API Key you will have to answer the questions on each of the screens:
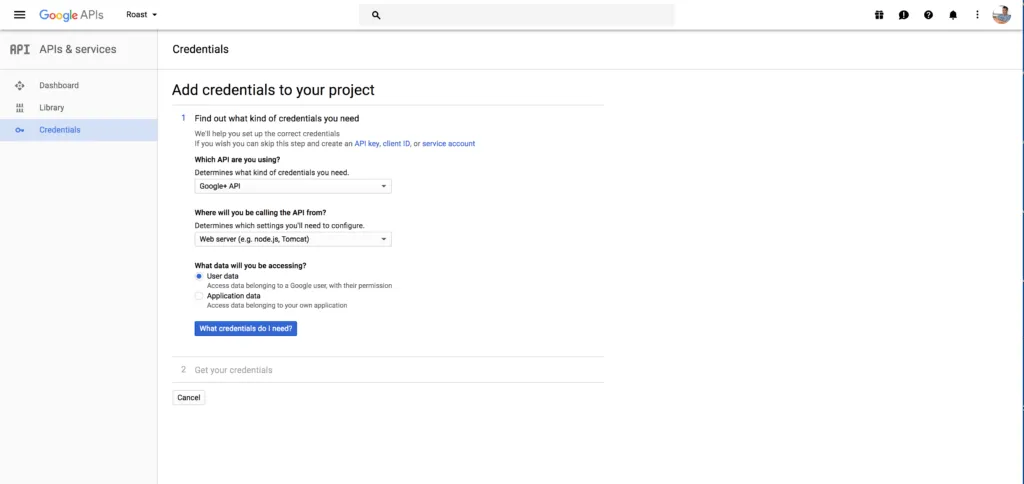
The first answer will be the Google+ API which allows the user to log in, so that's what we want to select. We aren't using any special data calls at this point, we just need to return the User ID and basic profile information. The next dropdown, we want to select a web server. We will be logging in with Laravel Socialite so we will need to do this through the web server. Next you want make sure the radio for 'User Data' is selected then click "What Credentials Do I Need?"
- The next screen will allow you to fill in the Javascript origin and Authorized Redirect URL. We are just filling in our development and production URLs so I just added roast.dev and roastandbrew.coffee for the Authorized Javascript Origin. It just needs to be the root domain of what you are building. The authorized callback URL is what Google will callback to after the user logs in. We haven't shelled this out in Laravel yet, but we will do that in the next section when we build our routes. For this tutorial the URL will be https://roast.dev/login/google/callback and https://roastandbrew.coffee/login/google/callback
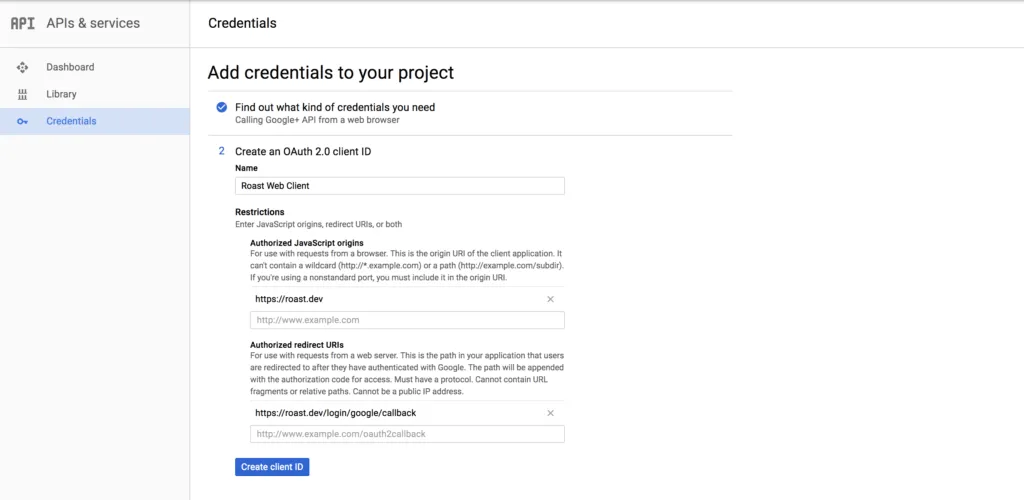 After this, click 'Create Client ID'
 - The next screen contains the information the user will see in their consent screen. The official name of the app is Roast and Brew Coffee. Since we are just setting up the development environment, I just selected my email and entered the name of the app. We will come back to this in a later tutorial when we push to production.
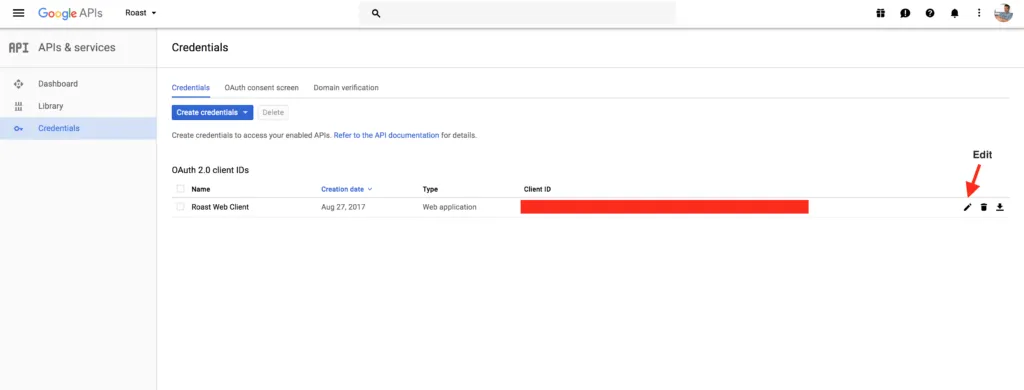
- Once you have completed the consent screen information you will finally have your Client ID. You can copy it from here. If you download the JSON your client secret will be there as well! We will need both the client secret and client id to add to our .env file. If you didn't download or copy the information, no worries it's in your Credentials screen and you can click the 'Edit' Pencil to view the client id and client secret.
Save this to your .env file
GOOGLE_APP_ID={GOOGLE_APP_ID}
GOOGLE_APP_SECRET={GOOGLE_APP_SECRET}
GOOGLE_REDIRECT=https://roast.dev/login/google/callback
- You should be go for Google login! In the next steps, we will be configuring our callback URLs. All you have to do is add the key to your services.php file:
'google' => [
      'client_id' => env('GOOGLE_APP_ID'),
      'client_secret' => env('GOOGLE_APP_SECRET'),
      'redirect' => env('GOOGLE_REDIRECT')
    ]
This will set up socialite to use Google logins!
Configuring Authentication URLs
With Laravel Socialite, this is super easy! We have all of our credentials set up for our 3 (you could have as many as you want) providers and saved in our .env file. We will just need to create a few routes, a controller, a migration and a view.
- Create Authentication Controller. To do this, add a file named AuthenticationController.php to /app/Http/Controllers/Web.
It should look like this when it's ready to modify:
<?php

namespace App\Http\Controllers\Web;

use Illuminate\Http\Request;
use App\Http\Controllers\Controller;

class AuthenticationController extends Controller
{
    //
}
The big thing to notice here is we changed the namespace from App\Http\Controllers to App\Http\Controllers\Web
- Add the following route to your /routes/web.php file:
Route::get('/login', 'Web\AppController@getLogin' )
      ->name('login')
      ->middleware('guest');
With this, we have a default page to log in to with our social accounts. We haven't created the method yet (next step ;) ) but this is just wiring everything up. We named this route 'login' because we are using the default authentication middleware that comes with Laravel. If the user is NOT logged in, Laravel will try to re-direct them to a route named 'login'. We just defined this route! We also have a middleware of guest attached to the route so the users that are logged in are auto re-directed to our app.
We also need to edit the \app\Http\Middleware\RedirectIfAuthenticated.php file and change the redirect url from \home to \. That's just the way your app is structured for routes. The file should look like:
<?php

namespace App\Http\Middleware;

use Closure;
use Illuminate\Support\Facades\Auth;

class RedirectIfAuthenticated
{
    /**
     * Handle an incoming request.
     *
     * @param  \Illuminate\Http\Request  $request
     * @param  \Closure  $next
     * @param  string|null  $guard
     * @return mixed
     */
    public function handle($request, Closure $next, $guard = null)
    {
        if (Auth::guard($guard)->check()) {
            return redirect('/');
        }

        return $next($request);
    }
}
- Add the
getLogin()method to theWeb\AppController.php. OurWeb\AppController.phpshould have 2 methods now and should look like:
<?php

namespace App\Http\Controllers\Web;

use App\Http\Controllers\Controller;

class AppController extends Controller
{
    public function getApp(){
        return view('app');
    }

    public function getLogin(){
        return view('login');
    }
}
We now have to create our login view which will provide the links for the Socialite login.
- Create
login.blade.phpin theresources\viewsdirectory. Right now we aren't worried about styles at all, we just want a few links. I'll be writing tutorials on some styling through SASS but right now we are just worried about user log ins. Right now my view looks like:
<!DOCTYPE html>
<html>
    <head>
        <meta name="viewport" content="width=device-width, initial-scale=1.0">
        <title>Roast</title>

    </head>
    <body>
        <a href="/login/google">
            Log In With Google
        </a>

        <br>

        <a href="/login/twitter">
            Log In With Twitter
        </a>

        <br>

        <a href="/login/facebook">
            Log In With Facebook
        </a>
    </body>
</html>
There are the 3 links to log in with our social media accounts. These routes don't exist yet, but we will be creating them in the next step. Don't worry, it's easy!
- Now we will add our Socialite Routes. In the
routes/web.phpfile we need to add the following routes:
Route::get( '/login/{social}', 'Web\AuthenticationController@getSocialRedirect' )
      ->middleware('guest');

Route::get( '/login/{social}/callback', 'Web\AuthenticationController@getSocialCallback' )
      ->middleware('guest');
These are the only 2 routes we need for Social Authentication! Notice how the callback URL follows the similar form we created for all of our Social Routes and we have a route parameter in our login urls? Socialite standardizes the information returned (at least for the basic info we need from each site) so we can use 100% of the same code for all authentication methods! For more on route parameters, check out the Laravel docs here: Routing - Laravel - The PHP Framework For Web Artisans
- Add the methods we referenced in step 5 to our
Web\AuthenticationController.php. Our controller should look like:
<?php

namespace App\Http\Controllers\Web;
use App\Http\Controllers\Controller;

use Illuminate\Http\Request;

class AuthenticationController extends Controller
{
    public function getSocialRedirect( $account ){

    }

    public function getSocialCallback( $account ){

    }
}
We will shell out these methods in the next steps.
- Build the social redirect method. We need to make sure we include the Socialite Facade in our controller as well. The method is super simple, and our controller should now look like:
<?php

namespace App\Http\Controllers\Web;

use Illuminate\Http\Request;
use App\Http\Controllers\Controller;
use Socialite;

class AuthenticationController extends Controller
{
    public function getSocialRedirect($account){
      try{
        return Socialite::with( $account )->redirect();
      }catch ( \InvalidArgumentException $e ){
        return redirect('/login');
      }
    }

    public function getSocialCallback( $account ){

    }
}
What the method does is redirect to the social provider requested in the URL. It catches any invalid provider and just redirects the user back to the login page. Obviously this functionality can be adjusted, maybe show an error screen or something if the provider doesn't exist. This will work for now.
- Before we build the social callback method, we need to run a migration so we can put all of the new users in the table. We can also authenticate any existing users. If you've been following the tutorials so far in order, we haven't ran a migration yet. If you've already ran the migration, make sure you have the two fields added to the users table.
If you don't want traditional username and password authentication (outside the scope of this article) we need to adjust a few migrations. First open your migrations directory in /database/migrations and find the {date}_create_users_table.php file. Add the following lines to the migration:
$table->string('provider');
$table->string('provider_id');
$table->text('avatar');
These will house the unique IDs returned from the social auth provider and allow us to authenticate as the user logging in. The provider field will be the name of the provider and the provider_id will be that provider's unique ID. The avatar will be the user's image.
Delete the {date}_create_passwords_reset.php migration. We are only using social auth (at least in these tutorials).
Run php artisan migrate
- Build getSocialCallback( $account ) method. This will handle all callbacks from social URLs. When we get the callback we will either create a new user or log in an existing user. First we have to define that we are going to use the User class so we will add
use App\User;to the top of the AuthenticationController.php class which is the namespace of our User model. We will also adduse Authto use the authentication facade to create a session with Laravel. Now we can fill out the rest of the method. The first step of the method is to grab the social user. Socialite gets this information through the callback. so you will add:
/*
  Grabs the user who authenticated via social account.
*/
$socialUser = Socialite::with( $account )->user();
Now we have the social user no matter what provider they came from, the glory of facades! We then check to see if the user already exists in the database using the provider + provider_id combo. If they don't exist, we create a new user.
/*
            Gets the user in our database where the provider ID
            returned matches a user we have stored.
        */
        $user = User::where( 'provider_id', '=', $socialUser->id )
                  ->where( 'provider', '=', $account )
                          ->first();

      /*
        Checks to see if a user exists. If not we need to create the
        user in the database before logging them in.
      */
      if( $user == null ){
        $newUser = new User();

        $newUser->name        = $socialUser->getName();
        $newUser->email       = $socialUser->getEmail() == '' ? '' : $socialUser->getEmail();
        $newUser->avatar      = $socialUser->getAvatar();
          $newUser->password    = '';
        $newUser->provider    = $account;
        $newUser->provider_id = $socialUser->getId();

        $newUser->save();

        $user = $newUser;
      }

      /*
        Log in the user
      */
      Auth::login( $user );
We check to see if the user we tried to receive was null. If they are null, the user doesn't exist and we create a new one. We can call certain methods on the socialUser variable that get information returned from the provider. For more information visit:
GitHub - laravel/socialite at 2.0
Updated for Laravel 5.6 visit Socialite Retrieving User Details
We now have a new user. We save the newUser to the user variable and then log in the user.
Last but not least, we redirect to the / url which is our app!
Our final method should look like this:
public function getSocialCallback( $account ){
      /*
        Grabs the user who authenticated via social account.
      */
      $socialUser = Socialite::with( $account )->user();

      /*
            Gets the user in our database where the provider ID
            returned matches a user we have stored.
        */
        $user = User::where( 'provider_id', '=', $socialUser->id )
                  ->where( 'provider', '=', $account )
                          ->first();

      /*
        Checks to see if a user exists. If not we need to create the
        user in the database before logging them in.
      */
      if( $user == null ){
        $newUser = new User();

        $newUser->name        = $socialUser->getName();
        $newUser->email       = $socialUser->getEmail() == '' ? '' : $socialUser->getEmail();
        $newUser->avatar      = $socialUser->getAvatar();
          $newUser->password    = '';
        $newUser->provider    = $account;
        $newUser->provider_id = $socialUser->getId();

        $newUser->save();

        $user = $newUser;
      }

      /*
        Log in the user
      */
      Auth::login( $user );

      /*
        Redirect to the app
      */
      return redirect('/');
    }
We now have a working Socialite install! Our app has 2 views, one to log in and the other as the core of the SPA. We will be installing and configuring Laravel passport for our needs in the next tutorial. This will begin to tie in the back end data section for what we need for our app.
Want to work together?
Professional developers choose Server Side Up to ship quality applications without surrendering control. Explore our tools and resources or work directly with us.

Join our community
We're a community of 3,000+ members help each other level up our development skills.
 Join our Discord
 Platinum Sponsors

Active Discord Members
We help each other through the challenges and share our knowledge when we learn something cool.
Stars on GitHub
Our community is active and growing.
Newsletter Subscribers
We send periodic updates what we're learning and what new tools are available. No spam. No BS.
Sign up for our newsletter
Be the first to know about our latest releases and product updates.
We're a community empowering product builders with self-hosted tools and open source solutions.